How to Change a Cabin Air Filter: Step-by-Step for Any Car

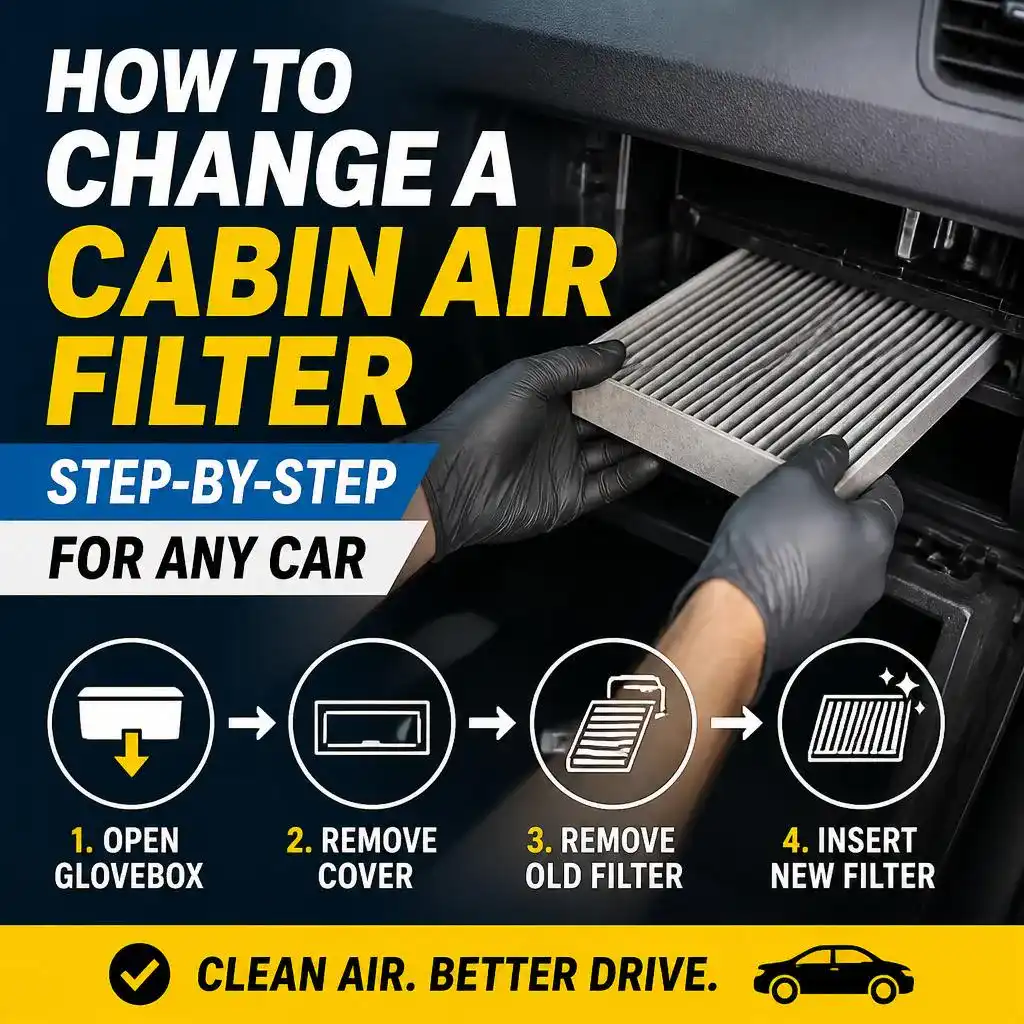
Most drivers pay a shop $40 to $115 to replace a part that costs $15 to $65 and takes ten minutes to swap yourself. The cabin air filter is one of the easiest maintenance tasks on any modern car, and the skill transfers across nearly every vehicle on the road.
I went through the process for all three common filter locations — behind the glove box, under the dash, and under the hood at the cowl — so this guide covers the full range of vehicles you are likely to own or work on.
What You Need Before You Start
Most cabin air filter replacements require no tools at all. A few vehicles need a basic screwdriver. Here is what to have ready:
- Replacement cabin air filter: Match your vehicle's year, make, and model. Most auto parts stores have a lookup tool at the counter, or use the filter cross-reference on the box.
- Phillips-head screwdriver: Needed on some vehicles to remove a panel or glove box stop screw.
- Small flashlight: Helpful for seeing into the filter housing, especially in tight or dark locations.
- Latex or nitrile gloves: Optional. Old filters can be quite dirty with pollen, dust, and debris.
- Small vacuum: Optional but useful for clearing debris that falls out of the housing during removal.
Pro tip: Buy the filter before you start. Confirm the correct part number for your vehicle, then begin the job. Nothing is worse than pulling out the old filter and discovering the replacement is the wrong size.
Step 1: Identify Your Filter Location
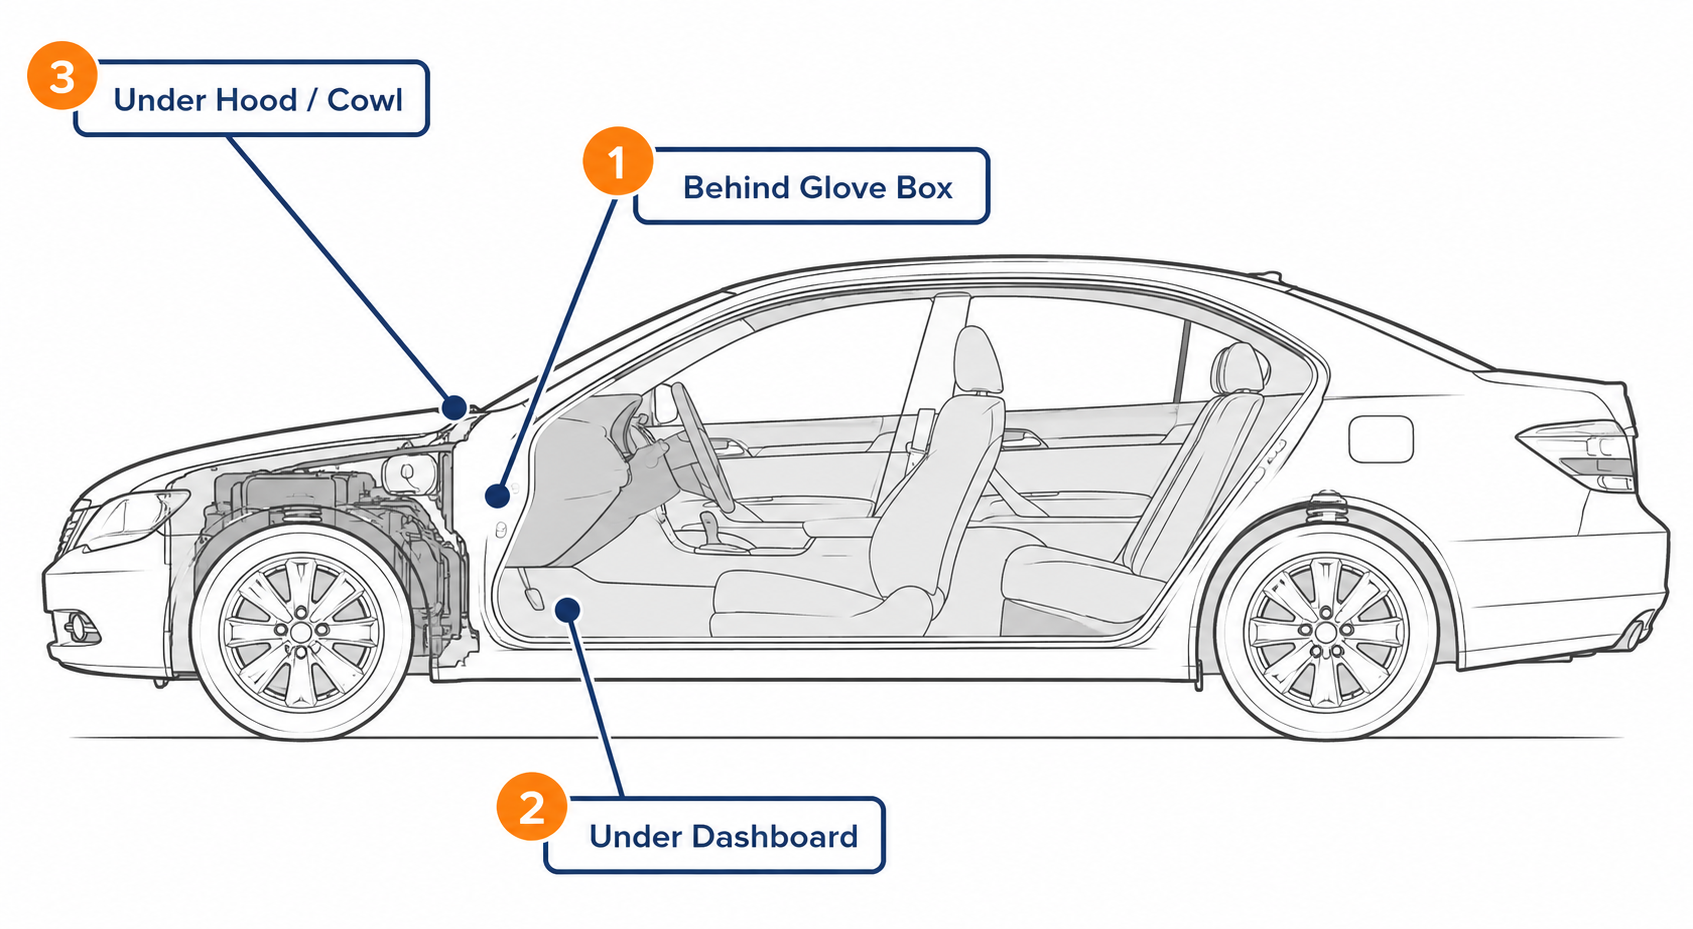
Before you can remove the filter, you need to know where it is. On most cars, it lives in one of three places.
2013 Chevrolet cabin air or no cabin air filter location
Behind the Glove Box
This is the most common location on modern vehicles. The cabin air filter housing sits directly behind the glove box, accessible once you drop or remove the box. This location is standard on most Toyota, Honda, Nissan, Subaru, Ford, Chevrolet, and Hyundai models built after 2000.
Under the Dashboard (Passenger Side)
Some vehicles route the filter housing under the passenger-side dashboard, behind a removable access panel near the floor or the lower dash trim. This is common on many Volkswagen, Audi, and some older GM models.
Under the Hood (Cowl Area)
Less common but still found on some vehicles, particularly older European models and some Chrysler products. The filter housing is at the base of the windshield where outside air enters the HVAC intake. You access it from the engine bay.
How to find your specific location: Check your owner's manual. It will list the cabin air filter under the maintenance or service section with the exact access procedure. If you do not have the manual, search "[year] [make] [model] cabin air filter location" and you will find a confirmed answer in under two minutes.
Step 2: Turn Off the Engine and HVAC System
Before removing the old filter, turn the engine off and set the HVAC fan to off. This is not strictly necessary for safety in most cases — the 12V system is low risk — but it prevents debris from getting sucked into the airflow pathway during the swap, and it ensures the new filter seats cleanly with no airflow disruption.
Leave the key in the accessory position if you need the glove box light, but the fan must be off.
Step 3: Access the Filter Housing
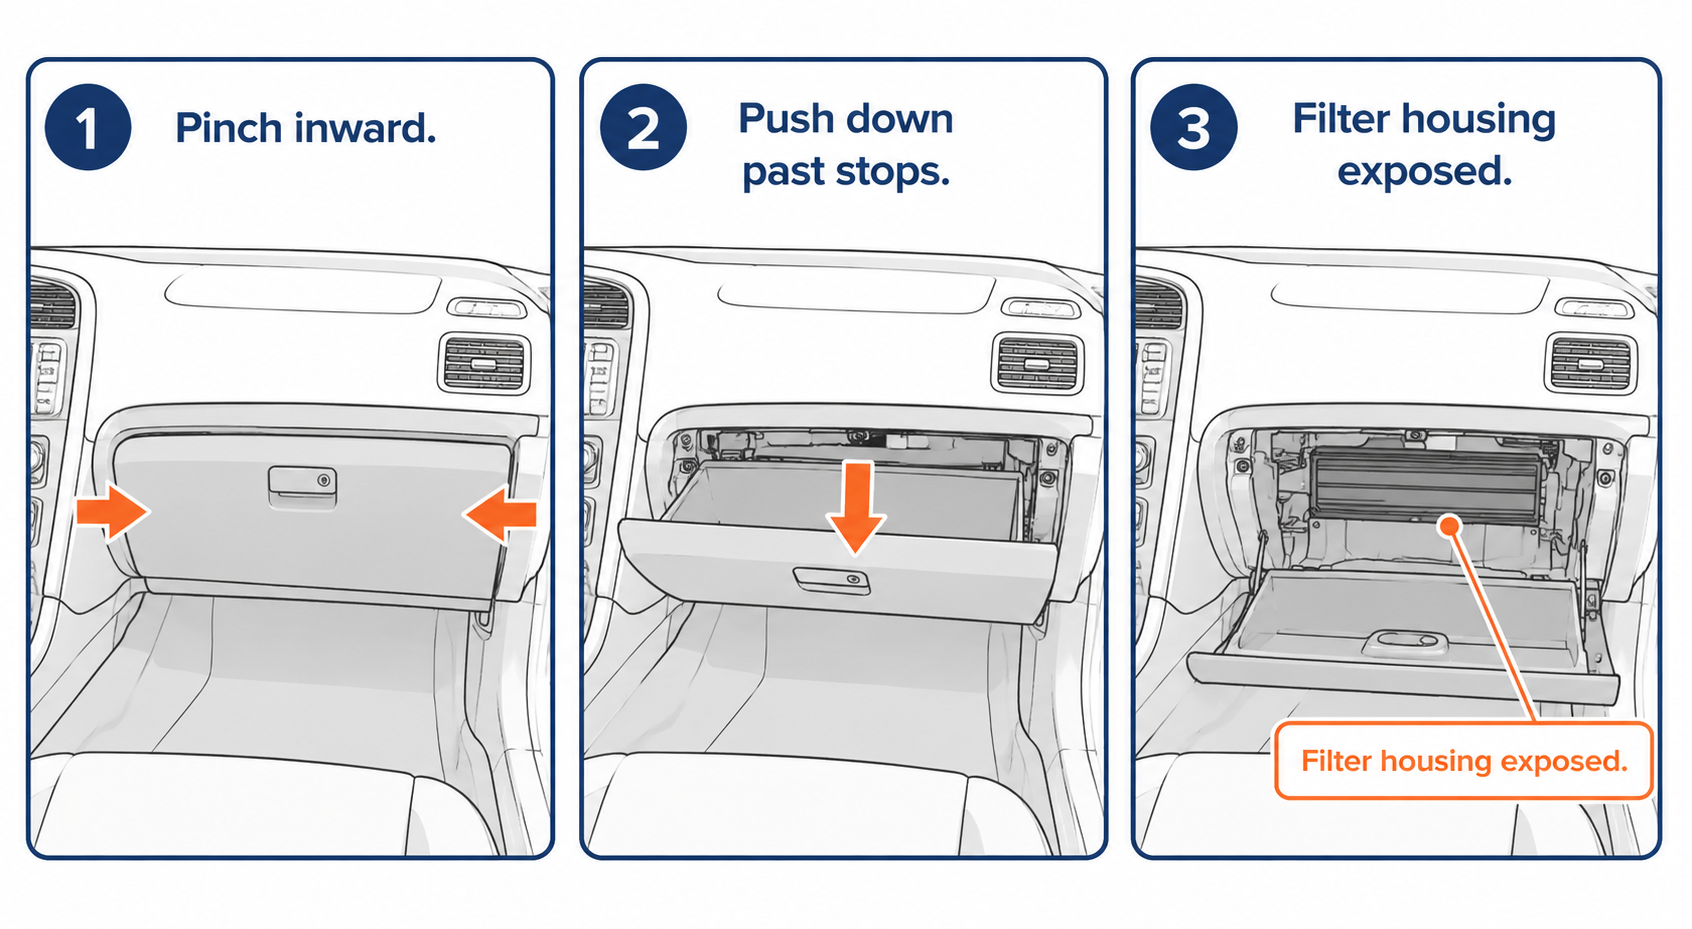
Behind the Glove Box (Most Common Method)
2012 - 2019 Dodge Grand Caravan Cabin Air Filter - How To Change - Remove Replace AC Location DIY
- Open the glove box fully.
- Look for two plastic clips or arms on either side of the glove box that act as stops. These prevent the box from swinging too far down.
- Pinch both sides of the glove box inward toward each other and push the box down past the stop arms. On many vehicles, this is all that is required — the box will drop down and hang from its hinges, fully exposing the filter housing behind it.
- On some vehicles, a single screw (usually Phillips) holds the glove box stop arm in place. Remove it if the pinch-and-drop method does not work.
- The filter housing is now visible. It is a rectangular compartment with a small door or cover secured by a plastic clip or a simple friction fit.
Under the Dashboard
- Locate the access panel on the lower passenger-side dash. It may be held by two or three Phillips screws, or it may simply snap on and off.
- Remove the panel and set it aside. The filter housing will be directly behind it.
- Some vehicles in this configuration have a horizontal filter housing that slides out to the side rather than dropping down.
Under the Hood (Cowl Area)
- Pop the hood and locate the plastic cowl panel at the base of the windshield, on the passenger side.
- The cowl panel is typically secured by several push-pin clips. Press the center pin of each clip down to release it, or use a trim removal tool to gently pry the clips out.
- Lift the cowl panel. The filter housing is directly underneath, fed by the fresh-air intake before air enters the cabin.
Step 4: Open the Filter Housing
Once the housing is exposed, open the cover. Most housings use one of three closure types:
- Friction-fit cover: Pull the cover tab down or to the side. No tools needed. It pops open.
- Plastic clip: Squeeze the clip tabs and the cover releases.
- Screw-secured cover: Remove one or two screws with a Phillips screwdriver, then lift the cover off.
Set the cover somewhere clean. It will go back on the same way.
Step 5: Remove the Old Filter
Slide the old filter out of the housing. On behind-the-glove-box installations, the filter usually slides horizontally outward toward you. On under-dash and cowl installations, it may slide vertically or at an angle.
As you remove it, note which way the airflow arrow is pointing on the old filter. The arrow should be pointing toward the cabin side of the housing (away from the engine/outside, toward the passenger compartment). You will install the new filter the same way.
Have a bag ready to drop the old filter into immediately. Old cabin air filters can be covered in pollen, dust, mold spores, and debris that you do not want floating around the cabin.
Check the housing while it is empty: Shine your flashlight into the housing cavity. If there are leaves, debris, or visible mold on the housing walls, wipe it out with a dry cloth or a brief pass with a small vacuum before installing the new filter. Installing a fresh filter into a dirty housing is worth avoiding.
Step 6: Install the New Filter
Take the new filter out of the box. Most replacement filters come with a directional airflow arrow printed on the side or edge.
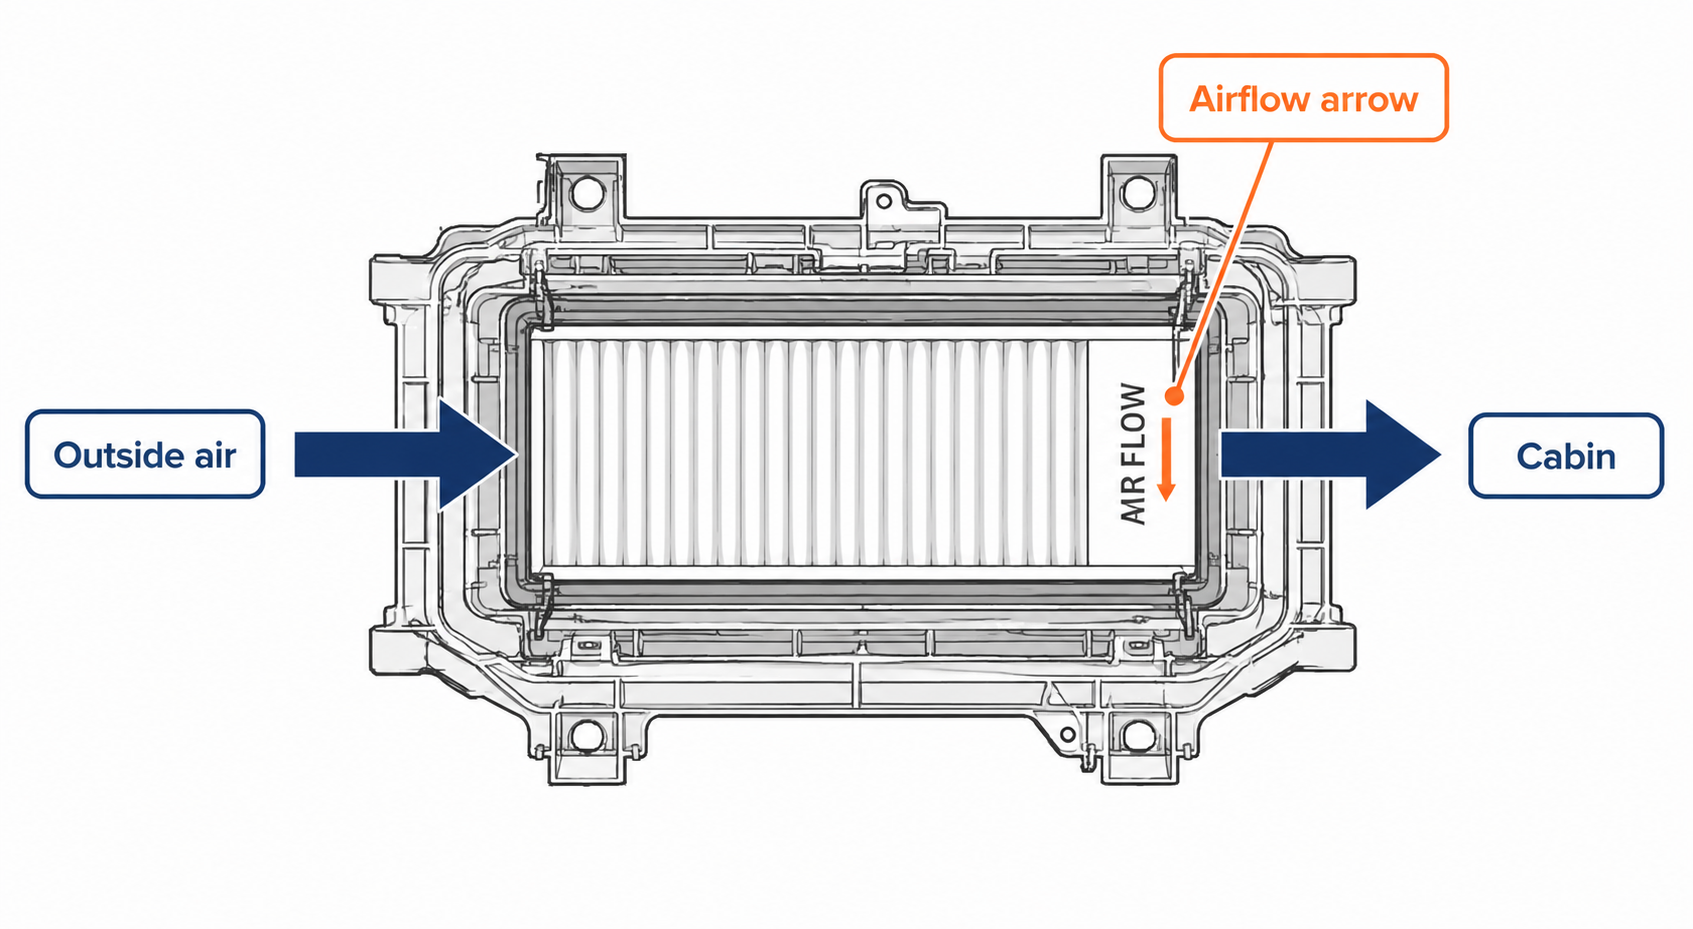
The arrow must point toward the cabin. In a behind-the-glove-box installation, this typically means the arrow points toward the back of the housing (the cabin side) as you slide it in. On cowl installations, the arrow points down and inward, toward the car's interior.
If there is no arrow on the new filter, install it in the same orientation you removed the old one. If the old filter had no arrow and was installed correctly from the factory, match that orientation exactly.
Slide the new filter fully into the housing until it seats flush. It should fit without forcing. If it does not go in easily, check that the filter is oriented correctly — attempting to insert it backward or at the wrong angle is the most common cause of resistance.
Step 7: Close the Housing and Reassemble
Close the filter housing cover the same way you opened it. Snap the clip, friction-fit the cover, or reinstall the screws. Do not overtighten screws on plastic housings — finger tight plus a quarter turn is enough.
Reassemble the glove box, dash panel, or cowl cover in reverse order of removal. For the glove box method: lift the box, align the side arms with their catches, and push the box back up into the closed position. The side clips should snap back into the stops.
Test the closure before finishing. The glove box should latch properly and the dash panel should sit flush with no gaps.
Step 8: Test the Installation
Turn the engine on and run the HVAC fan on a medium setting for 30 seconds. You should notice:
- Normal or improved airflow from the vents
- No unusual noise from the housing (a rattling sound can indicate the filter is not fully seated)
- No musty odor that was present with the old filter
If airflow seems reduced after the new filter, open the housing again and confirm the filter is seated flat with no folded edges. A filter that is partially dislodged will restrict airflow.
How Long Does This Take?
For behind-the-glove-box filters, most drivers finish the job in 5 to 10 minutes the first time. After doing it once, 5 minutes is realistic.
Under-dash locations take a bit longer — 10 to 20 minutes — because removing the access panel requires more steps.
Cowl installations are the most time-consuming, typically 15 to 30 minutes, because of the cowl panel removal and the need to work in the engine bay.
What Does a Cabin Air Filter Cost?
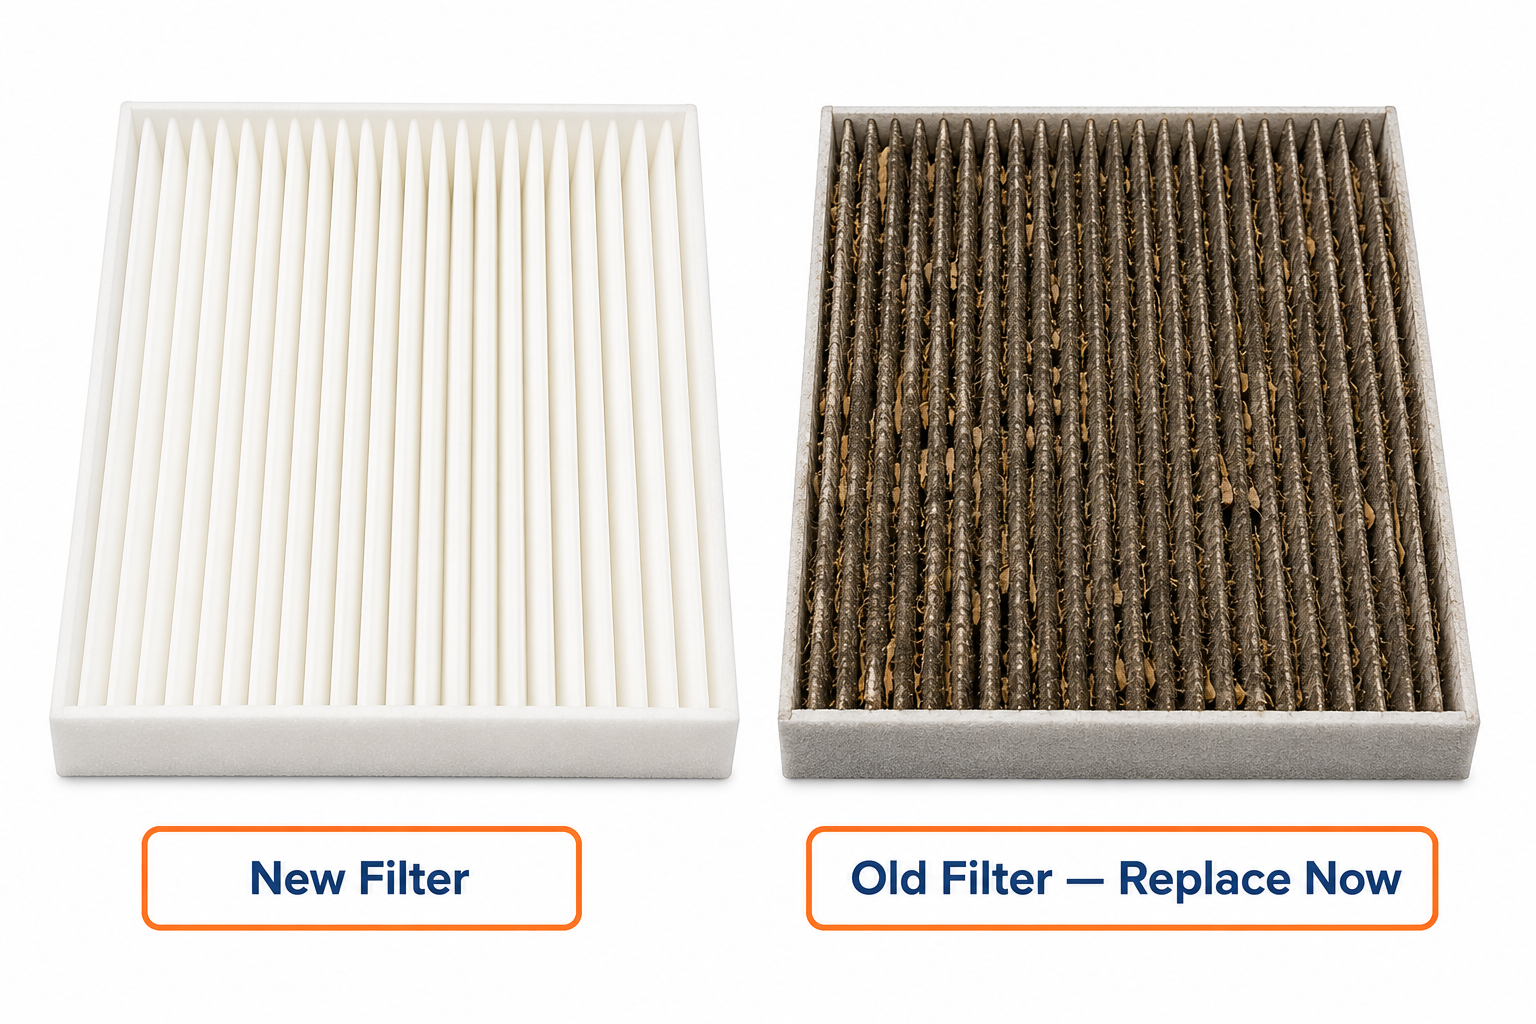
The filter itself is the only cost if you do it yourself.
Dealership service departments typically charge $85 to $115 for this replacement, which includes about 15 minutes of labor and a significant markup on the filter. Independent shops are typically $40 to $75.
The part is the same regardless of who installs it. Doing it yourself saves the full labor charge for a task that requires no specialized knowledge or tools.
Does the Filter Direction Actually Matter?
Yes. The airflow arrow matters for two reasons.
First, the filtration media inside the filter is layered, with coarser filtration on the incoming side and finer media deeper in. Installing the filter backward routes air through the fine media first, which loads it faster and reduces service life.
Second, on activated carbon combo filters, the carbon layer is on the downstream side. Install it backward and the carbon layer faces incoming dirty air, which can reduce its effectiveness and may allow fine particles to bypass the main filtration stage.
The short answer: always match the arrow to the airflow direction. The arrow always points toward the cabin.
FAQ
Do I need to turn off the car to change the cabin air filter?
You should turn off the engine and the HVAC fan before swapping the filter. This prevents debris from the old filter from entering the airflow pathway during the change and ensures the new filter seats cleanly. The job itself carries no electrical risk, but the fan-off step is good practice.
How do I know which cabin air filter fits my car?
Use the year, make, model, and engine size lookup at any auto parts retailer (AutoZone, O'Reilly, NAPA, RockAuto). The filter box will confirm the fitment. If the replacement came with multiple filter sizes, the correct one will fit the housing with no gaps and no forcing.
Can I clean and reinstall my cabin air filter instead of replacing it?
Standard paper and cellulose cabin air filters are designed for single use. Blowing them out with compressed air removes loose surface debris but does not restore filtration capacity — the media fiber structure is permanently loaded after normal use. Reusable cabin air filters made from cotton gauze exist but are rarely specified for cabin use. If your filter is dirty, replace it.
How often should I change the cabin air filter?
The standard recommendation is every 12,000 to 15,000 miles or once per year, whichever comes first. In high-pollen, dusty, or heavily polluted environments, inspect it every 10,000 miles and replace it whenever it is visibly gray or blocked.
What happens if I install the cabin air filter backward?
The filter will still work, but not optimally. The media layers are designed with a specific entry face. Installing it backward loads the fine filtration layer first instead of last, which shortens the filter's service life. Activated carbon filters are particularly sensitive to orientation because the carbon layer must face the clean air (cabin) side to function correctly.
My glove box won't drop down. What am I missing?
Most vehicles have plastic stop arms or bumpers on the sides of the glove box that limit its downward travel. You need to pinch the sides of the box inward toward each other to disengage these stops before the box will drop past them. Some vehicles have a small screw holding the stop arm — check the left or right interior wall of the glove box opening for a Phillips screw.
Changing a cabin air filter is one of the fastest maintenance jobs you can do on a modern car. Once you locate the housing and understand how the glove box drops, the job takes less time than a trip to the drive-through. Check yours at every oil change and replace it when it is visibly dirty or at the standard interval. The air quality inside your car is directly tied to the condition of this filter. Keeping it fresh is a five-minute decision with a real impact.