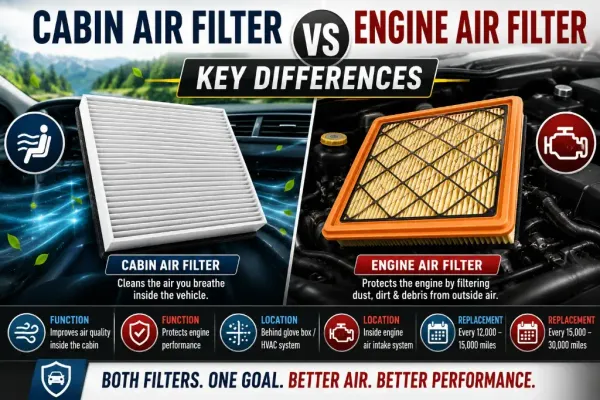
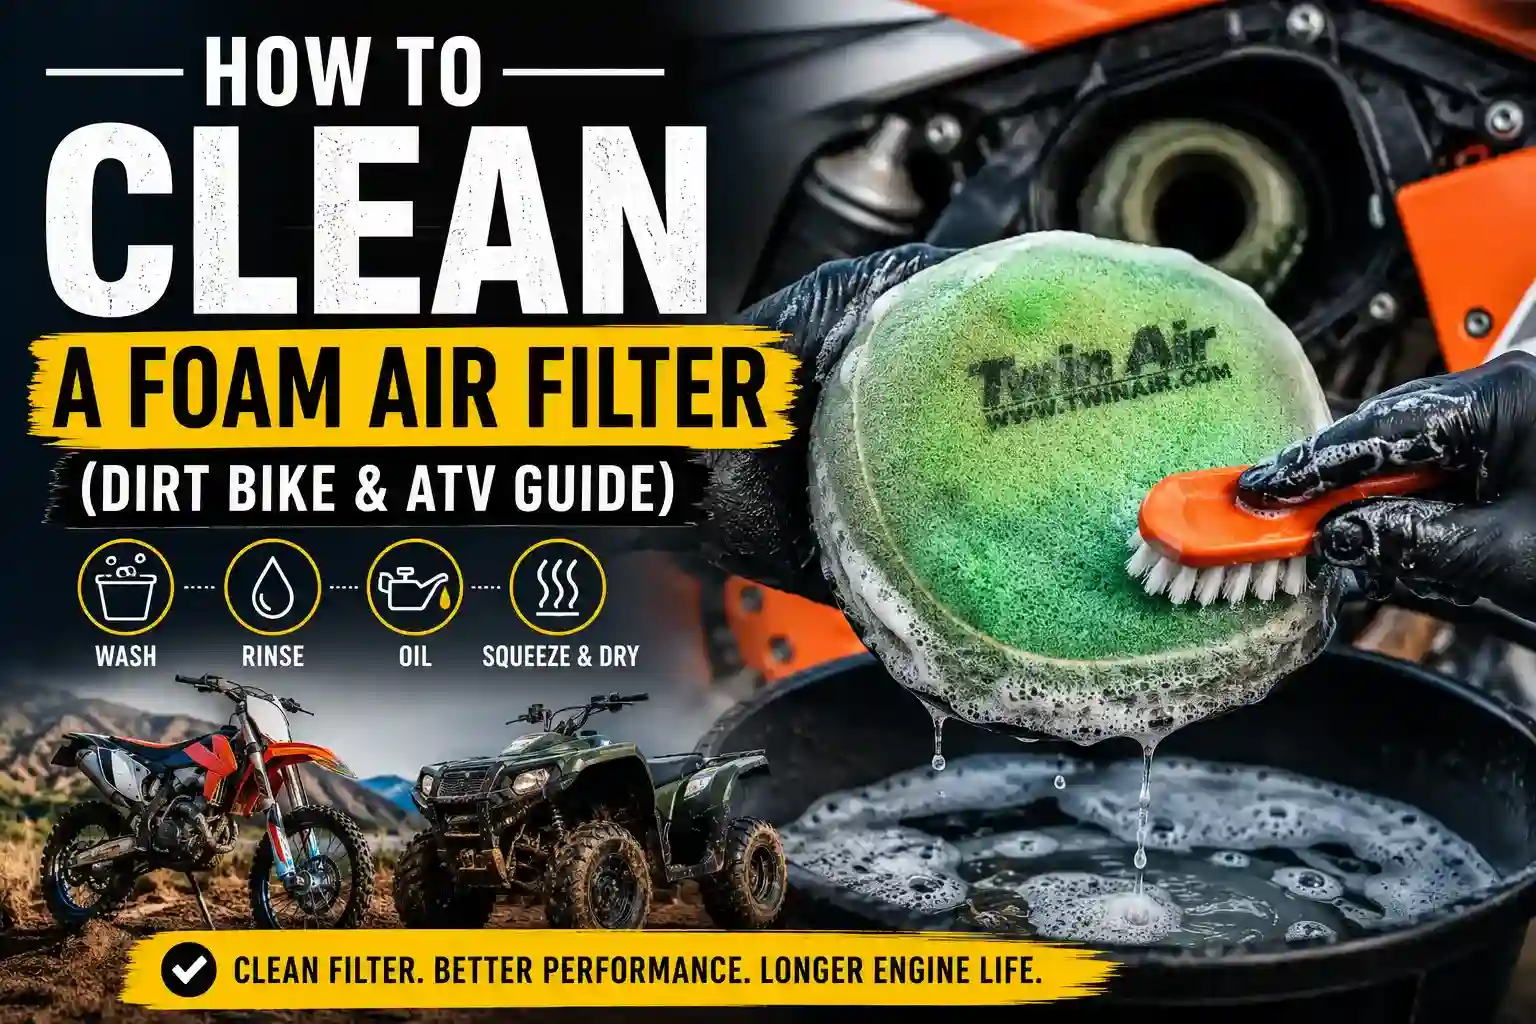
How to Clean a Foam Air Filter (Dirt Bike & ATV Guide)

Cleaning a foam air filter takes about 20 minutes. Remove the filter, wash it with a dedicated foam filter cleaner or dish soap, rinse with cold water, let it dry completely, coat it in foam filter oil, squeeze out the excess, and reinstall. That sequence is the same whether you ride a dirt bike, ATV, or UTV.
How To Clean & Oil a Foam Air Filter on Motorcycle or ATV
Why Foam Filters Need Regular Cleaning
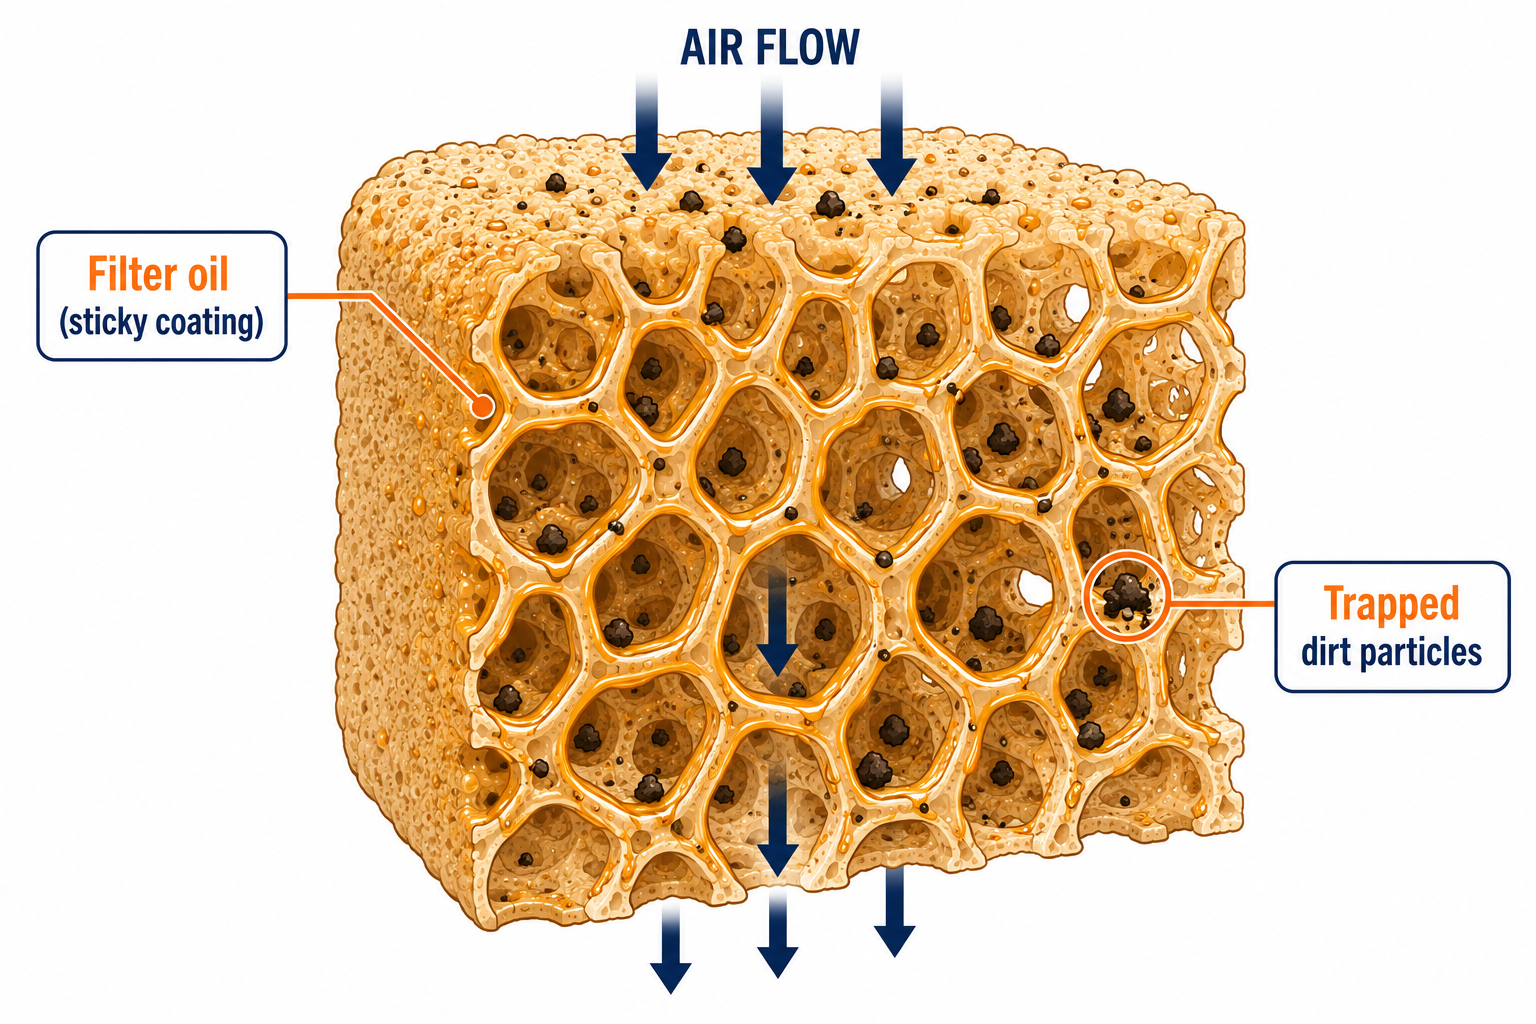
Foam filters trap dirt through a combination of the open-cell foam structure and a sticky filter oil coating. As dirt accumulates, the oil gets saturated. A saturated filter does two things wrong at once: it restricts airflow and it stops catching fine particles effectively.
On a dirt bike or ATV, this matters more than on a street vehicle. Trail riding kicks up roost, mud, and fine dust constantly. A clogged foam filter will choke the engine, cause a rich running condition, and eventually let abrasive particles through as the foam degrades.
The fix is simple. Clean the filter before it gets to the point of restriction.
What Happens If You Skip Cleaning
A dirty foam filter starves the engine of air. The fuel-to-air ratio goes rich. You'll notice a loss of power, sluggish throttle response, and sometimes black smoke at the exhaust.
If the filter stays dirty long enough, the foam begins to break down. At that point, fine particles can pass through gaps or tears into the intake tract. Dirt entering the engine causes premature wear on piston rings and cylinder walls. That is the expensive outcome a $10 cleaning prevents.
What You Need Before You Start
Gather everything before pulling the filter. You do not want to leave the airbox open while you search for supplies.
What you need:
- Foam filter cleaner (No Toil, Maxima, PJ1, or similar)
- Foam filter oil (same brand as cleaner, or universal)
- A plastic bag or gloves (filter oil stains skin and bench tops)
- A clean bucket or basin for washing
- Paper towels or a clean rag
- A clean rag to seal the airbox intake while the filter dries
Optional but useful:
- Airbox cover or a latex glove to stuff in the intake port while the filter is off the bike
- A second filter so you can ride while the first one dries
Step 1: Remove the Filter
On most dirt bikes, the airbox is accessed by removing the seat and side panels. On most ATVs and UTVs, a side panel or hood gives you access. Consult your owner's manual if the location is unclear.
Once the airbox is open, remove the filter. Most foam filters slide onto a cage or frame and are secured with a single bolt or a locking ring at the base.
Before you set the filter aside: stuff a clean rag into the intake port of the airbox. This prevents dirt or debris from falling into the engine while the filter is off. Do not skip this step.
Inspect the filter cage while the filter is off. Wipe out any dirt or debris from inside the airbox with a rag. A small amount of dirt in the airbox is normal. A lot of accumulated grit suggests the filter seal was compromised and you should inspect the mounting surfaces carefully.
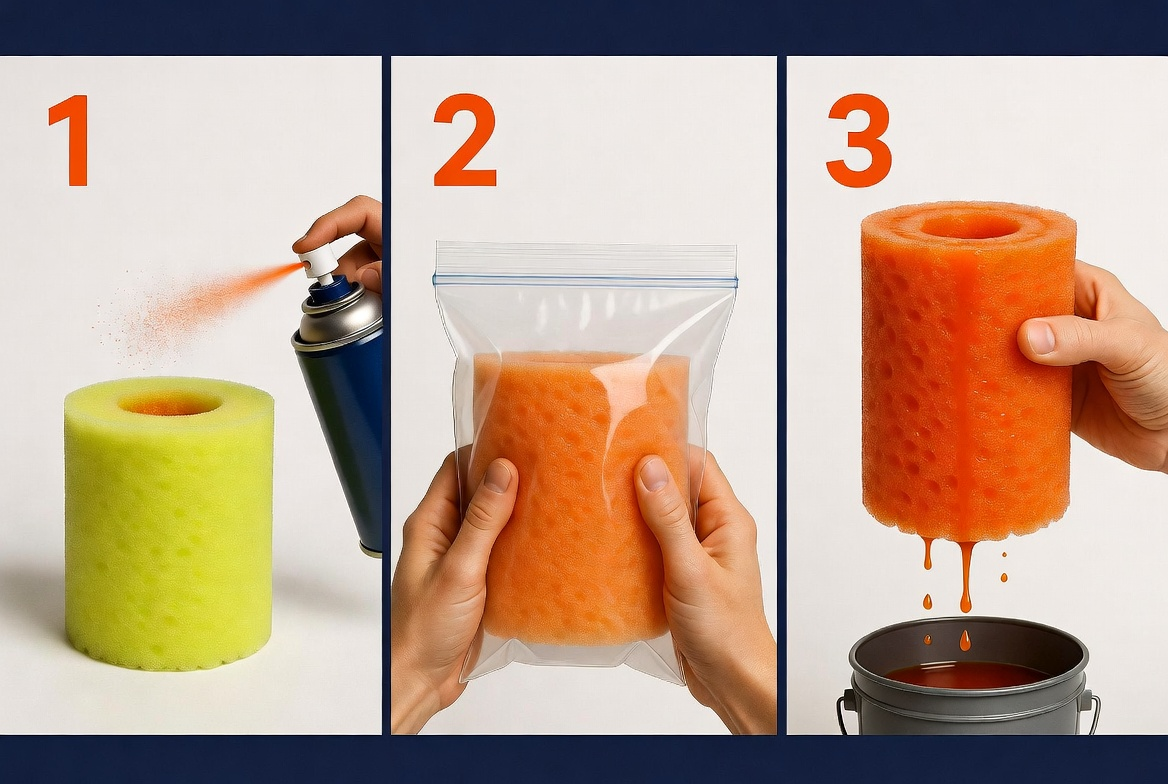
Step 2: Apply Foam Filter Cleaner
Hold the filter over a bucket and apply foam filter cleaner generously to the outside of the filter. Work it in by gently squeezing the foam from the outside in.
Do not wring or twist the foam. Foam filter material tears easily when wrung. Squeeze gently with both hands in a compression motion.
Let the cleaner soak for 3 to 5 minutes. This loosens the old filter oil and the trapped dirt embedded in it.
Can You Use Dish Soap Instead of a Dedicated Cleaner?
Yes, dish soap works for lightly soiled filters. Many foam filter brands list a degreasing dish soap as an acceptable alternative when dedicated cleaner is not available. Use a degreasing dish soap and follow the same process: apply, soak briefly, rinse.
Do not use gasoline, kerosene, or acetone. These solvents dissolve the foam itself. Even a short soak in gasoline will leave the foam brittle and cracked. A damaged filter is worse than no filter because it passes particles while still creating the appearance of protection.
Do not use solvent-based parts cleaner or brake cleaner for the same reason.
Step 3: Rinse Thoroughly
Rinse the filter under cold running water. Work from the inside out: let water flow from the inside of the filter through the foam to push dirt out the outside surface.
Keep rinsing until the water runs completely clear. Rinse time is usually 2 to 3 minutes under a tap with decent pressure.
Use cold water, not hot. Hot water can break down the adhesive that holds the filter seam together on many foam filters.
Gently squeeze the filter to express water, then check the rinse water. If it still runs gray or brown, apply cleaner again and repeat.
Step 4: Dry the Filter Completely
This step takes the most time and is where most people make mistakes.
Gently squeeze the filter to remove as much water as possible. Do not wring or twist. Then set it on a clean rag or paper towels in a warm, dry area.
The filter must be completely dry before you apply oil. A wet filter dilutes the oil, leaves uneven coverage, and can cause the oil to migrate off the foam during the first ride. Give the filter several hours to air dry at room temperature before oiling.
If you are in a hurry, you can place the filter in a warm area. Do not use a heat gun, hair dryer, or direct sunlight on a hot surface. Excessive heat degrades the foam.
You can also gently pat the filter with paper towels to speed drying, but avoid compressing it forcefully.
Step 5: Apply Foam Filter Oil
With the filter completely dry, it is time to oil it. This is the step that most directly affects filtration performance. Too little oil and the filter lets fine particles through. Too much oil and airflow is restricted and the oil can migrate into the intake.
HOW TO CLEAN and OIL a Foam AIR FILTER (on any Motorcycle, ATV etc)
How to Oil a Foam Filter
There are two methods, depending on the type of oil you are using.
Spray-on oil (most common): Hold the filter over a clean surface and spray the oil evenly across the entire outer surface. Rotate the filter and hit every section, including the inside. Then put the filter in a plastic bag and gently massage it from outside the bag to work the oil uniformly through the foam. Remove the filter from the bag and check the coverage: the foam should be uniformly coated, with no dry white or gray sections showing through.
Liquid squeeze-bottle oil: Pour oil into the filter and massage it through from outside. Same end goal: uniform coating throughout the foam.
The color test: Most foam filter oils are red, blue, or yellow. After oiling, squeeze a small section of the filter. If clear liquid comes out, that area is still uncoated. Add more oil. If oil-colored liquid comes out, you have coverage.
How Much Oil Is Right?
After massaging the oil in, gently squeeze the filter over a bucket to remove excess. You should see a small amount of oil drip out. This is correct: it means the foam is saturated but not oversaturated.
If a large volume of oil pours out, you used too much. Blot the outside gently with a paper towel and continue squeezing until the dripping reduces to a few drops.
A correctly oiled filter will feel tacky on the outside surface. It will not drip oil when held upside down.
Step 6: Reinstall the Filter
Before reinstalling, check the filter for damage: tears in the foam, cracks in the seam, degraded foam that crumbles between your fingers. A torn or crumbling filter should be replaced, not reinstalled.
Check the airbox mounting surface. Wipe it clean and inspect the rubber sealing ring or lip where the filter seats. A poor seal here bypasses the filter entirely and sends unfiltered air straight into the engine.
Apply a thin layer of filter oil or a dedicated airbox grease to the mounting flange if your filter and brand recommend it. Some manufacturers include this step in their instructions; others do not.
Remove the rag from the intake port. Double-check that nothing else is in the airbox. Seat the filter onto the cage or frame, making sure the seam and mounting flange are fully seated. Reinstall the locking ring or bolt and tighten to the manufacturer's spec.
How Often Should You Clean a Foam Air Filter?
The interval depends entirely on riding conditions, not mileage.
Some riders keep two filters: one installed and one clean and pre-oiled on the shelf. After a ride, they swap the filters and clean the dirty one at their leisure. This eliminates any delay before the next ride.
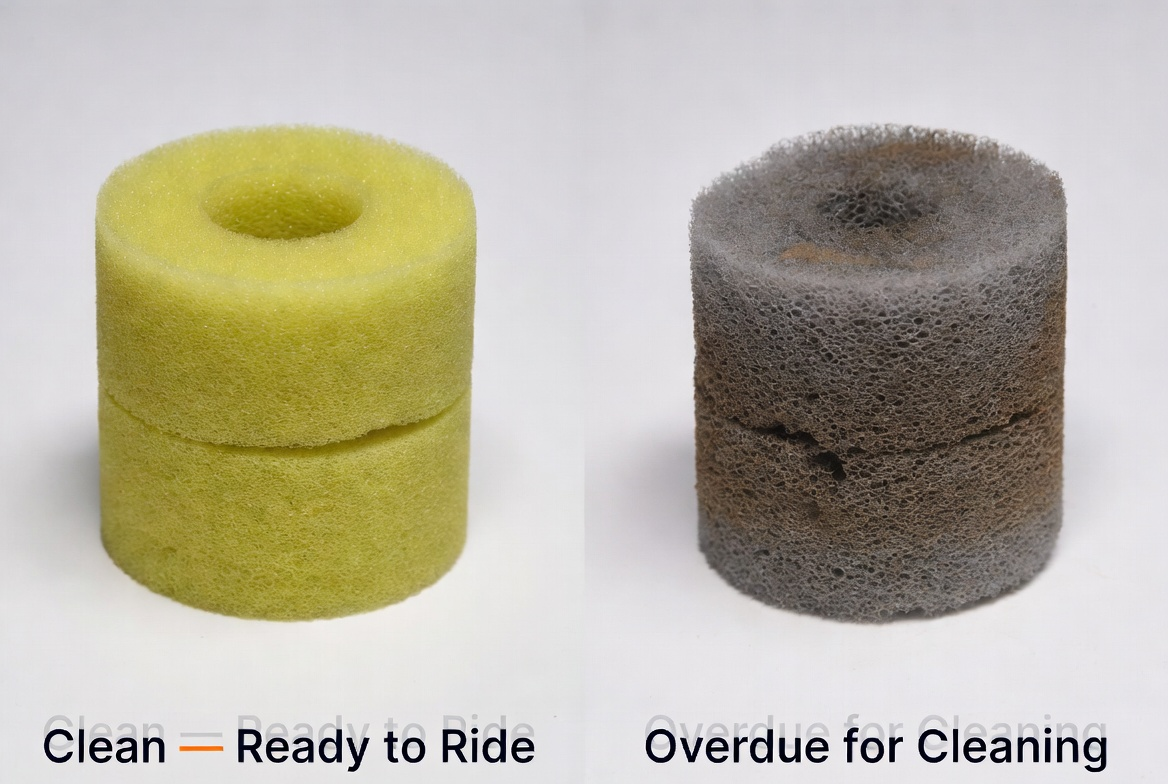
Visual inspection is your most reliable guide. Pull the filter before a ride if you have not checked it recently. Hold it up to a light. If the foam is heavily discolored, stiff, or you cannot see light through sections of it, clean it before you ride.
How to Know When to Replace Instead of Clean
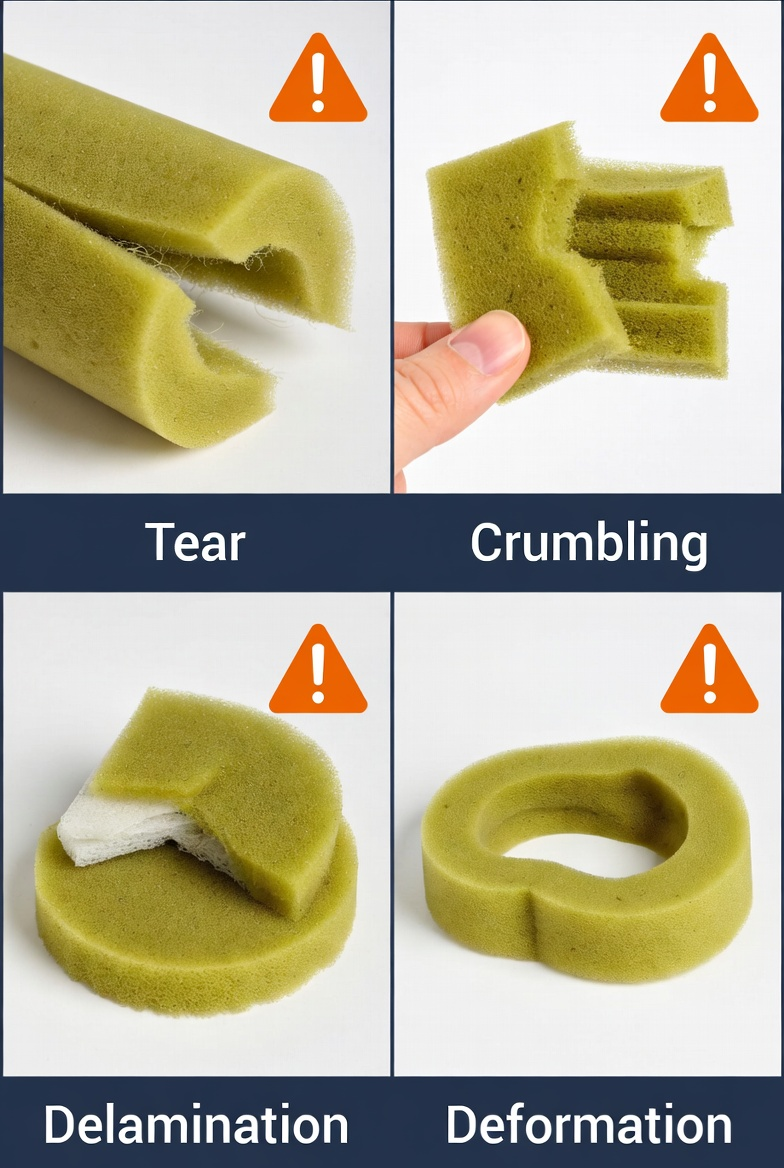
Not every dirty foam filter can be saved. Replace the filter when you see:
- Tears or holes in the foam, even small ones. A torn filter passes debris directly.
- Crumbling or brittle foam. Foam that breaks apart when compressed is past its life.
- Delamination. If your filter is a dual-stage design (coarser outer layer bonded to a finer inner layer), separation between layers signals end of life.
- Permanent deformation. If the filter no longer holds its shape and cannot be coaxed back to its original form, replace it.
- Persistent chemical smell. If someone previously cleaned the filter with gasoline or harsh solvent, the foam may be internally degraded even if it looks intact externally.
A replacement foam filter for most dirt bikes and ATVs costs $10 to $25. That is cheap insurance compared to an engine rebuild.
Foam Filter vs K&N Cotton Gauze: Different Cleaning Needs
Foam filters and cotton gauze filters like K&N use completely different cleaning protocols.
The two filter types are not interchangeable in cleaning approach. Using K&N Power Kleen on a foam filter, or applying K&N oil to a foam filter, will not harm the foam, but neither is optimized for foam filter media. Use the products designed for your filter type.
FAQ
Can I clean a foam air filter with gasoline?
No. Gasoline dissolves the foam and makes it brittle. Even a brief soak will degrade the material. Use a dedicated foam filter cleaner or dish soap and rinse thoroughly with cold water.
How long does a foam air filter take to dry?
Foam filters need several hours at room temperature to dry completely. Thicker dual-stage filters may need longer. The filter must be fully dry before oiling. Applying oil to a wet filter gives uneven coverage and poor filtration.
Do you have to use the same brand of oil as cleaner?
No. Most foam filter oils are compatible with each other. The key is using a product formulated specifically for foam filter media. Avoid WD-40, motor oil, and other petroleum products not designed for air filters.
Can a foam air filter be over-oiled?
Yes. An over-oiled filter restricts airflow and can cause a rich running condition similar to a clogged filter. After massaging oil through the foam, gently squeeze over a bucket to express excess. A few drops dripping out is correct. A stream of oil is too much.
What is a dual-stage foam filter?
A dual-stage foam filter has two layers: a coarser outer foam that catches large particles and a finer inner foam that catches smaller ones. The outer layer takes the brunt of contamination and can be cleaned more frequently. The inner layer stays cleaner longer. Both layers get oiled during reassembly.
How do I know if my foam filter has a good seal in the airbox?
With the filter properly seated, there should be no gaps between the filter flange and the airbox mounting surface. Run your finger around the entire seating surface. If you feel any daylight gaps, the filter is not sealing. A poor seal means unfiltered air bypasses the filter entirely.
The Short Version
Clean your foam filter with dedicated cleaner or dish soap, rinse until the water runs clear, let it dry completely, oil it evenly until the foam is uniformly tacky, squeeze out the excess, and reinstall.
Do it before the filter looks destroyed, not after. In dusty conditions, that means after every one to two rides.