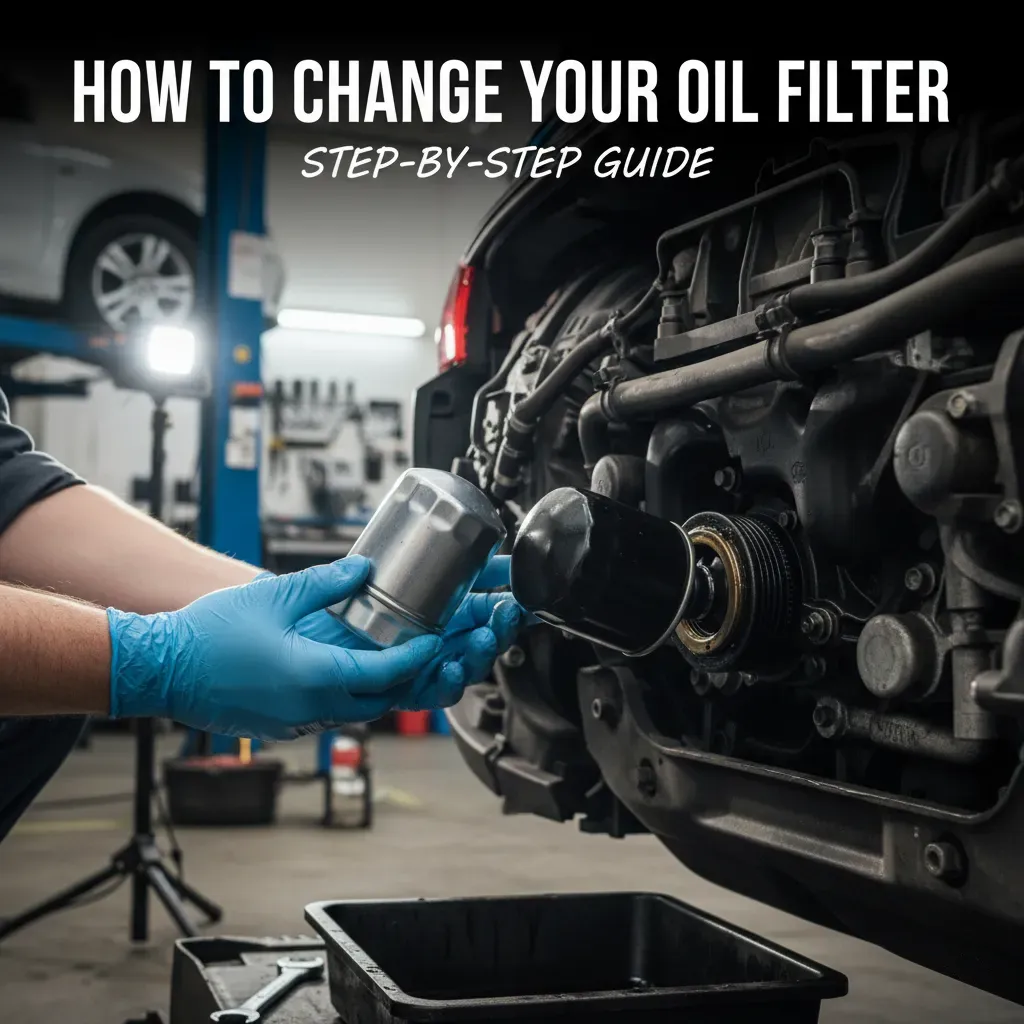
How to Change Your Oil Filter: Step-by-Step Guide

Most people change their oil filter at the same time as their engine oil. That is the right call. A filter loaded with old, contaminated oil defeats the purpose of a fresh fill.
Before you start, check your owner's manual for the oil filter part number and the oil specification your engine requires. Both matter.
What Tools Do You Need to Change an Oil Filter?
You need different tools depending on your filter type.
For a spin-on filter:
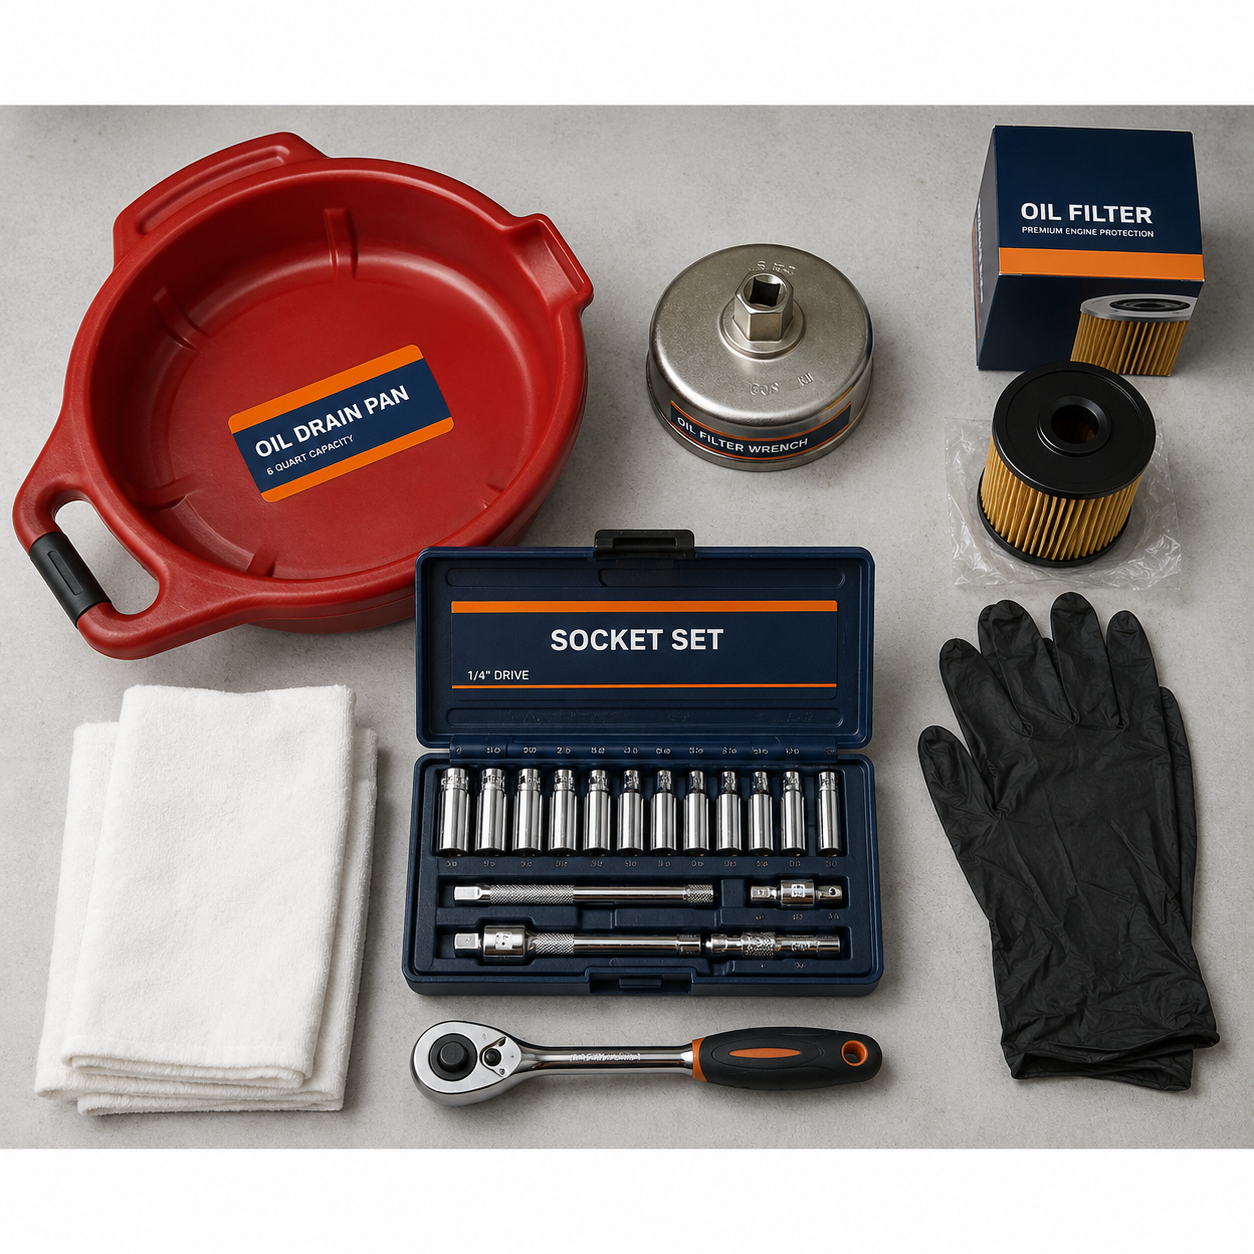
- Oil drain pan (at least 6-quart capacity)
- Oil filter wrench (cap, band, or plier style)
- Socket set and ratchet
- Drain plug socket (usually 14mm, 15mm, or 17mm)
- Clean rags
- Nitrile gloves
- New oil filter
- Fresh engine oil (correct spec and quantity for your engine)
- Funnel
For a cartridge filter:
- Oil drain pan
- Cap-style oil filter housing wrench (sized for your vehicle)
- Socket set and ratchet
- Torque wrench (recommended)
- Clean rags
- New filter cartridge and O-ring (usually included in the kit)
- Fresh engine oil
- Funnel
An oil filter wrench is not optional. Filters tighten under heat and pressure. You will not remove most used filters by hand. A cap wrench fits over the filter housing like a socket. A band wrench grips around the outside. Both work. The cap style gives more torque and is the better choice if you have it.
Do You Need to Drain the Oil Before Changing the Oil Filter?
You should always drain the oil before removing the filter. Here is why.
On most vehicles, the oil filter sits above the oil pan level. When you remove a loaded filter, residual oil inside it dumps out. That oil runs down the engine block, the subframe, and onto the floor. Draining first reduces the volume of oil that spills.
More importantly, you should be changing the oil and filter together anyway. Running a new filter with old oil is not a money-saving move. Check how often to change your oil filter if you are unsure of your interval. The filter will load up with degraded oil contaminants faster than if it started with a clean fill.
The only exception is a filter that sits completely below oil level on a dry-sump or remote-mount setup. In those cases, draining is mandatory to prevent a significant spill.
Tip: Let the engine warm up for two to three minutes before draining. Warm oil flows out faster and carries more suspended particles with it. Do not drain a fully hot engine — the oil will burn you.
How to Change a Spin-On Oil Filter: Step by Step
Spin-on filters are the most common type on passenger vehicles. They are a single self-contained unit that threads directly onto the engine block.
How to Change Spin-On Oil Filter on a Vintage Volkswagen Beetle
Step 1: Gather your supplies and warm the engine
Have everything ready before you start. A cold engine takes much longer to drain. Run the engine for two to three minutes, then shut it off and wait five minutes for the oil to settle back into the pan.
Step 2: Position the drain pan and remove the drain plug
Slide under the vehicle and position the drain pan directly under the drain plug. Remove the drain plug with the correct socket. Oil will flow fast at first. Let it drain fully — five to ten minutes for most engines.
While the oil drains, set the new filter and a small amount of fresh oil within reach.
Step 3: Locate the oil filter
The spin-on filter is a cylindrical metal canister, typically located on the side or bottom of the engine block. If you are not sure where it is,check the owner's manual or look it up by make and model.
Step 4: Remove the old filter
Position the drain pan under the filter, not just under the drain plug. Filters hold a significant amount of oil.
Use the filter wrench to break it loose. Turn counterclockwise. Once it is loose, use your hand to finish unscrewing it. Keep the filter oriented straight up as long as possible to minimize spills.
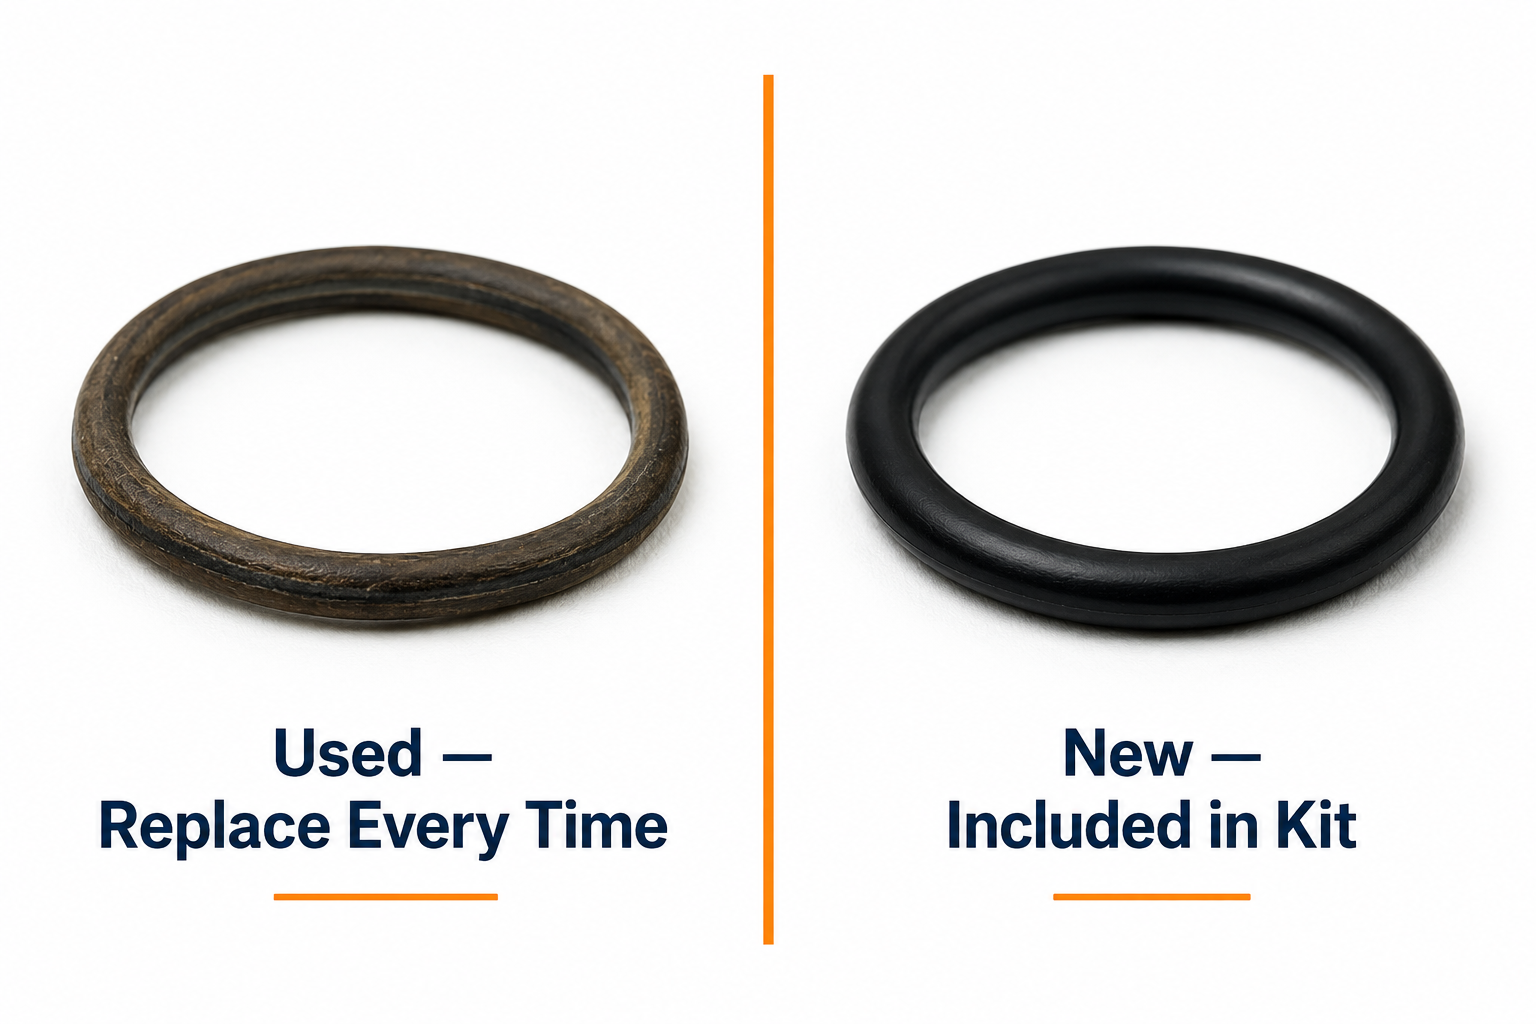
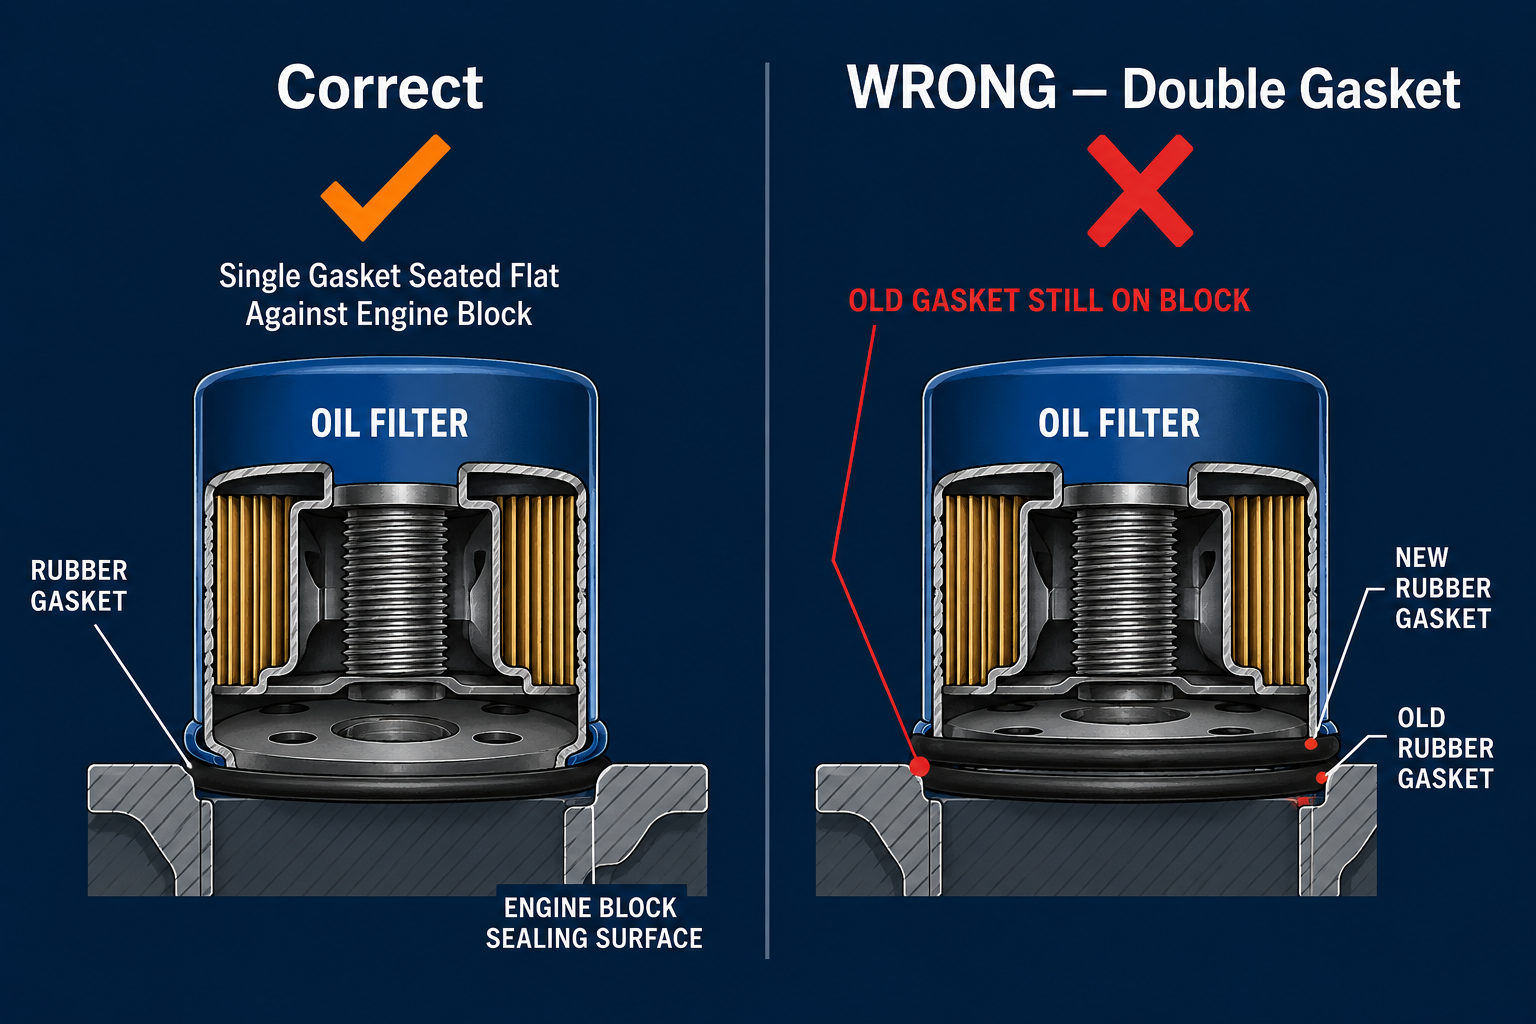
Inspect the old filter. Look for the rubber gasket. It must come off with the old filter. If it stayed on the engine block, remove it now. Running two gaskets on the new filter causes oil leaks.
Step 5: Prep the new filter
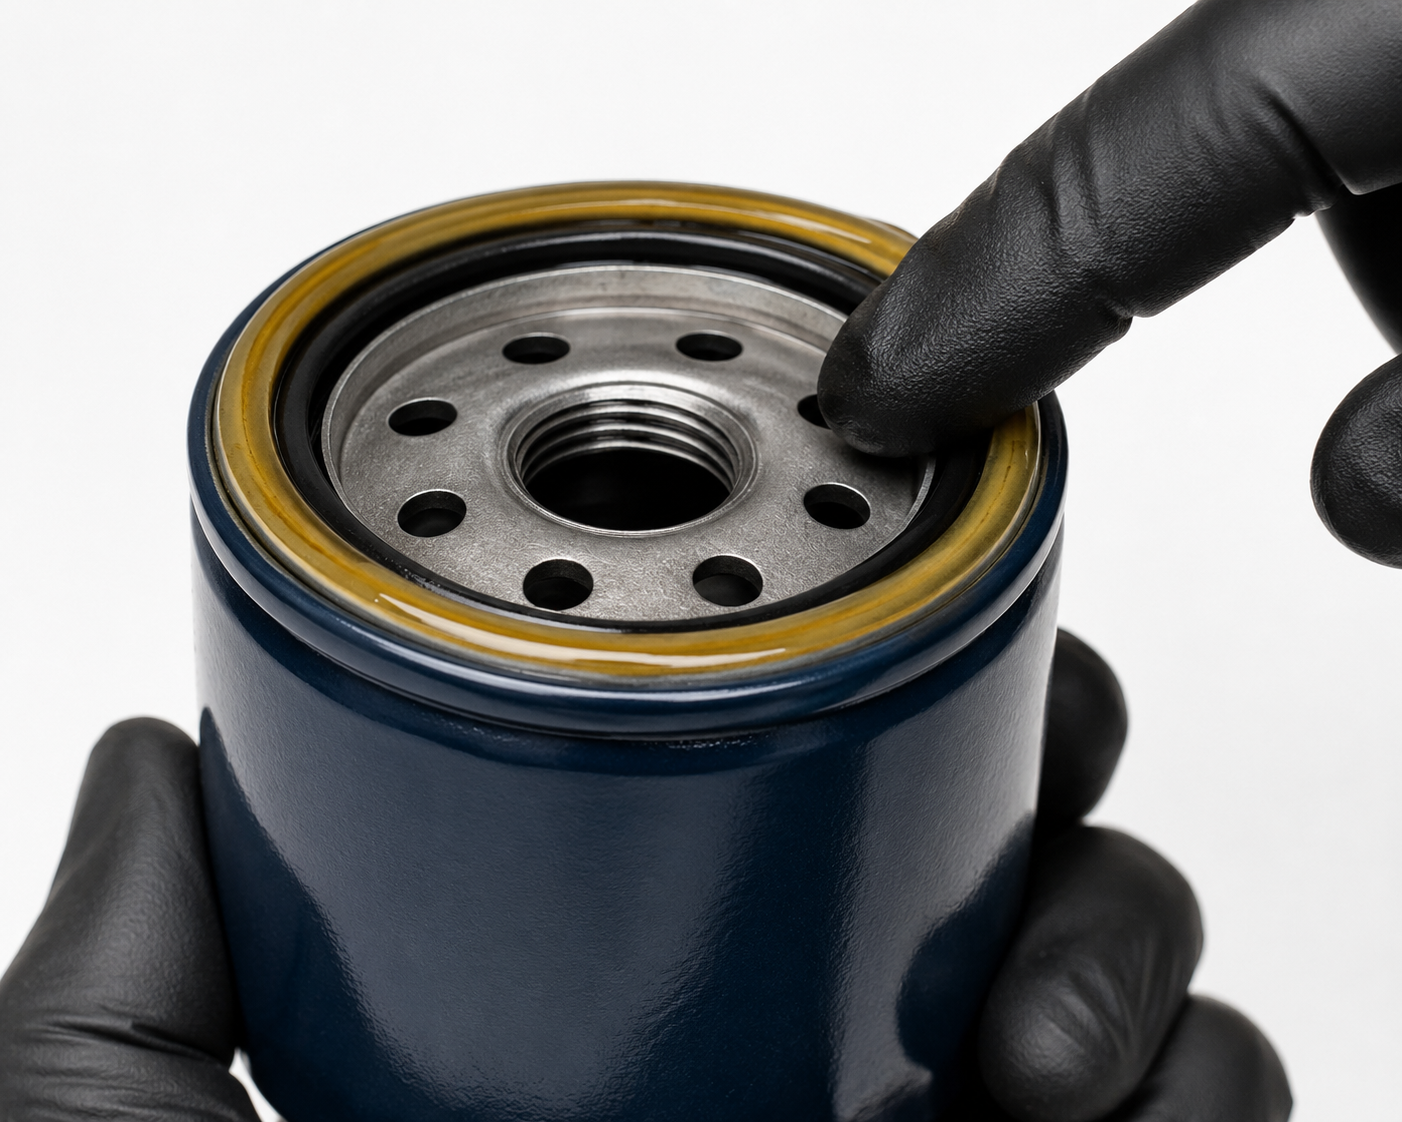
Dip your finger in fresh engine oil and wipe a thin, even coat around the entire rubber gasket on the new filter. This lubrication does two things. It lets the filter seat evenly as it threads in, and it prevents the gasket from tearing when you tighten it.
Step 6: Install the new filter
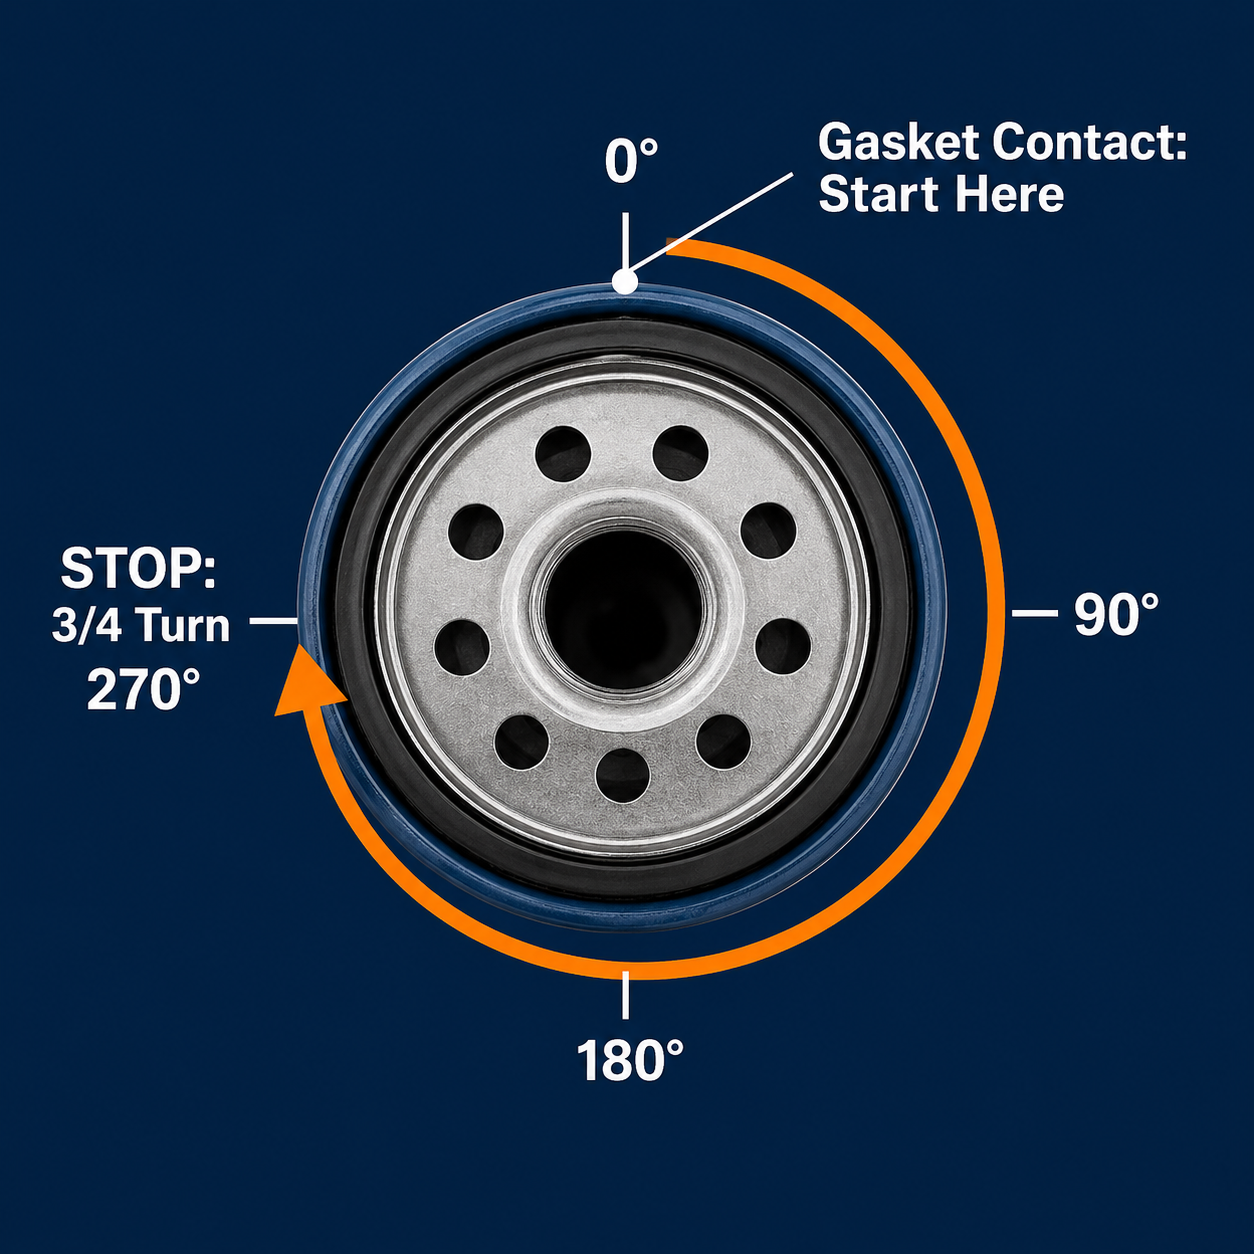
Thread the new filter on by hand. Spin it clockwise until the gasket makes contact with the engine block, then tighten by hand an additional three-quarter to one full turn. That is it. Do not use the wrench to tighten. Over-tightening crushes the gasket and makes the filter nearly impossible to remove at the next oil change.
Step 7: Reinstall the drain plug
Check the drain plug washer. Many manufacturers specify a new crush washer at every oil change. If yours is aluminum or copper and looks deformed, replace it. Thread the drain plug in by hand first to avoid cross-threading, then torque to spec. Check your owner's manual or a repair database for the correct torque value. Most passenger vehicles fall in the 27 to 40 Nm (20 to 30 ft-lb) range, but this varies by vehicle and pan material — aluminum pans sit at the lower end of that range.
Step 8: Refill with fresh oil
Remove the oil filler cap on top of the engine. Use a funnel. Pour in the manufacturer-specified quantity of fresh oil. Most 4-cylinder engines take 4 to 5 quarts. Most 6-cylinder and V8 engines take 5 to 7 quarts. Check your owner's manual for the exact amount and specification.
Replace the filler cap.
Step 9: Start the engine and check for leaks
Start the engine. The oil pressure warning light will stay on for a few seconds while the system primes. That is normal. Once the light goes out, let the engine idle for about 30 seconds.
Shut off the engine. Look under the car for oil drips at the drain plug and at the filter. Then check the filter visually. Wipe it clean with a rag and look for wet oil seeping from the gasket area.
No leaks: you are done. Check the oil level on the dipstick and top off if needed.
Step 10: Dispose of the old oil
Pour the used oil from the drain pan into a sealed container, such as the empty oil jugs you just emptied. Take it to an auto parts store. AutoZone and O'Reilly Auto Parts accept used motor oil at no charge. Call ahead to confirm your local store participates, as availability varies by state.
How to Change a Cartridge Oil Filter: Step by Step
Toyota Plastic Filter Housing Cap Canister Replacement
Cartridge filters are a paper or synthetic element housed inside a reusable plastic or metal housing mounted to the engine. They are increasingly common on European vehicles and newer platforms. The process is similar to a spin-on change but adds a few steps for housing removal.
Step 1: Warm the engine and gather tools
Same as with a spin-on filter. Run the engine briefly, shut off, wait five minutes.
Step 2: Position the drain pan and remove the drain plug
Drain the oil fully before touching the filter housing. Cartridge housing locations are often vertical, and they hold a significant amount of oil.
Step 3: Locate the filter housing
The housing is usually a plastic cap on top of the engine, toward the front. It has a drain-down port in some designs that lets oil drain before you fully remove the cap. Check for this before removing.
Step 4: Remove the housing cap
Use the correct cap wrench or socket for your vehicle's housing. Turn counterclockwise to loosen. Remove the cap slowly. Residual oil inside the housing will drain as you lift the cap.
Pull the old filter element out of the housing. Some elements have a small handle tab. Others require you to grip the media directly.
Step 5: Replace the O-rings
This step is where cartridge changes differ most from spin-on. The housing cap has one or two O-rings that seal the system. These must be replaced at every filter change. Most aftermarket filter kits include new O-rings. Lube them with a thin coat of fresh oil before installing.
Do not skip this step. A failed O-ring is the most common cause of post-change leaks on cartridge systems.
Step 6: Install the new filter element
Drop the new filter element into the housing. Make sure it seats fully into the bottom locating tab or groove.
Step 7: Reinstall the housing cap
Thread the cap in by hand first to confirm it catches the threads cleanly. Use the cap wrench to snug it. Then torque to specification using a torque wrench. Most cartridge housing caps torque to 20 to 25 Nm, but always verify the spec for your specific vehicle. Over-torquing plastic housings cracks them.
Step 8: Reinstall the drain plug, refill, and check for leaks
Same as the spin-on process from Step 7 onward. Refill with the specified oil, start the engine, check for leaks at both the drain plug and the housing cap.
How Tight Should You Tighten an Oil Filter?
For spin-on filters: hand-tight plus three-quarter to one full turn after gasket contact. No wrench needed for installation. A wrench is only for removal.
For cartridge housing caps: use a torque wrench to the manufacturer specification. Most caps spec 20 to 25 Nm. Check your owner's manual or a repair database. Guessing on a plastic housing risks cracking it.
The most common installation error is over-tightening a spin-on filter. Mechanics sometimes reach for the wrench out of habit. The result is a crushed gasket that either leaks or makes the next removal a fight.
What Happens If You Don't Lubricate the Oil Filter Gasket?
A dry gasket can do two things: it can tear as the filter threads down, creating an immediate leak path. Or it can seize to the engine block sealing surface and tear when you try to remove it next time.
Neither scenario is catastrophic, but both are preventable with 10 seconds of preparation. Always coat the new gasket with a thin film of fresh oil before installation.
How to Prevent Oil Spills When Removing the Filter
Oil spills are the messiest part of a filter change. Here are three techniques that help.
Position the pan correctly. The drain pan needs to be under the filter, not just under the drain plug. Most of the mess comes from filter removal, not drain plug removal.
Orient the filter on the way out. Keep the filter as level as possible as you unscrew it. The moment you angle it, the oil inside pours toward the open end. Slow is less messy.
Use a filter removal bag. Some shops slide a large zip-lock or plastic bag over the filter before cracking it loose. The bag catches the oil as the filter comes off. It is not elegant, but it works on tight spaces where angling the filter is unavoidable.
For cartridge housings, let the oil drain down through the housing drain port (if equipped) before fully removing the cap.
How to Know If the Oil Filter Is Installed Correctly
Three checks confirm a proper installation.
The gasket is seated flat. Before threading the filter on, look at the sealing surface on the engine block. It should be clean and flat. The new filter gasket should sit flush against it, not cocked to one side.
No old gasket on the block. After removing the old filter, confirm its gasket came with it. A second gasket stacked on top creates a leak.
The engine holds pressure and shows no leaks after startup. After refilling and starting the engine, the oil pressure light should extinguish within a few seconds. Once the engine is shut off, wipe the filter area clean and inspect for seepage. A correctly installed filter shows nothing.
Which Oil Filter Should You Use?
The filter must match your engine's thread pitch and gasket diameter. Use the part number from your owner's manual or look it up by year, make, model, and engine size at the counter.
Beyond fitment, the quality of the filter media matters. Cheaper filters use cellulose media. Better filters use cellulose and synthetic blends or full synthetic fiber, which captures smaller particles and holds more contamination before bypass. The difference matters most on long oil change intervals and on turbocharged engines, which circulate oil through higher heat and pressure.
Frequently Asked Questions
Can you change an oil filter without draining the oil?
Technically yes on some vehicles where the filter sits below oil level, but you will spill oil. You also lose the benefit of fresh oil with a clean filter. The filter and oil should always be changed together.
How often should you change the oil filter?
At every oil change. Running a used filter with new oil defeats the purpose of the fresh fill. The filter is loaded with contaminated oil from the previous interval.
Is it bad to over-tighten an oil filter?
Yes. Over-tightening crushes the rubber gasket. A crushed gasket either tears and leaks immediately or bonds to the sealing surface and tears on removal. Install spin-on filters hand-tight plus three-quarter to one full turn only.
Why is there oil on the outside of my new filter after startup?
If the leak is at the gasket: either the old gasket stayed on the block (two gaskets stacked), the new gasket was not lubricated and tore during installation, or the filter was not tightened enough. Check all three. Shut off the engine immediately and inspect before adding mileage. A persistent external leak can be a sign of a bad oil filter.
Can I change just the oil filter without changing the oil?
It is not recommended. The filter is saturated with old oil. Installing a new filter and leaving dirty oil in the engine means the new filter immediately begins processing contaminated oil. The change interval should always cover both.
What to Do After the Oil Change
Reset your oil life monitor if your vehicle has one. Most systems have a reset procedure in the instrument cluster menu. Check your owner's manual.
Check the oil level once the engine has cooled for a few minutes after the first startup. Sometimes a small amount of oil wets the filter and lines, dropping the level slightly below the full mark.
Keep a record: date, mileage, oil specification used, and filter brand. That log is useful if you ever need to make a warranty claim or troubleshoot an engine issue.