How to Clean a Reusable Oil Filter

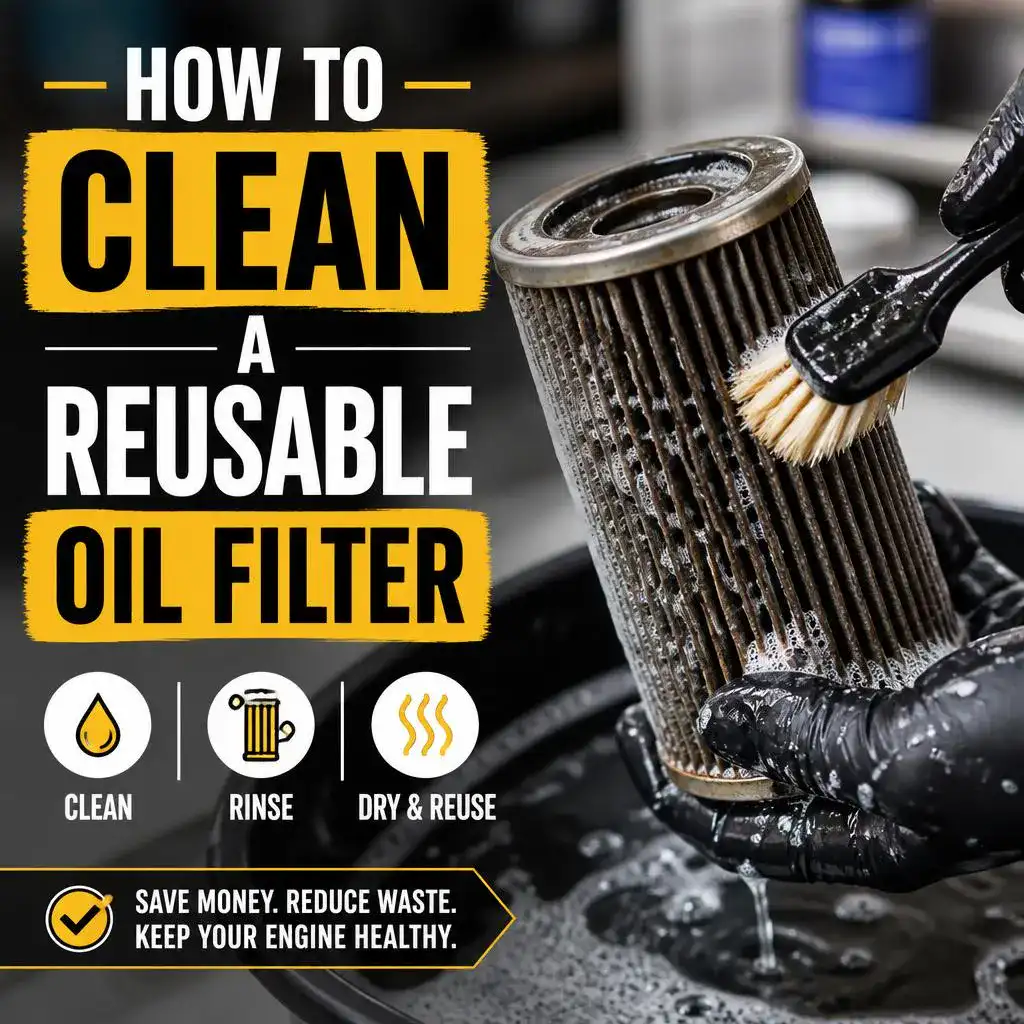
Cleaning a reusable oil filter takes about 15 to 20 minutes and requires nothing more than a solvent-safe pan, a low-pressure garden hose, and some patience. The key is to flush in the opposite direction of normal flow, let the element dry completely before reinstalling, and only blow compressed air from the inside out never from outside in.
What Is a Reusable Oil Filter?
A reusable oil filter uses a permanent stainless steel mesh or wire-screen element instead of the paper or cellulose media found in disposable filters. The housing is typically machined from aluminum. The filter element itself is designed to be removed, washed, and reinstalled cycle after cycle.
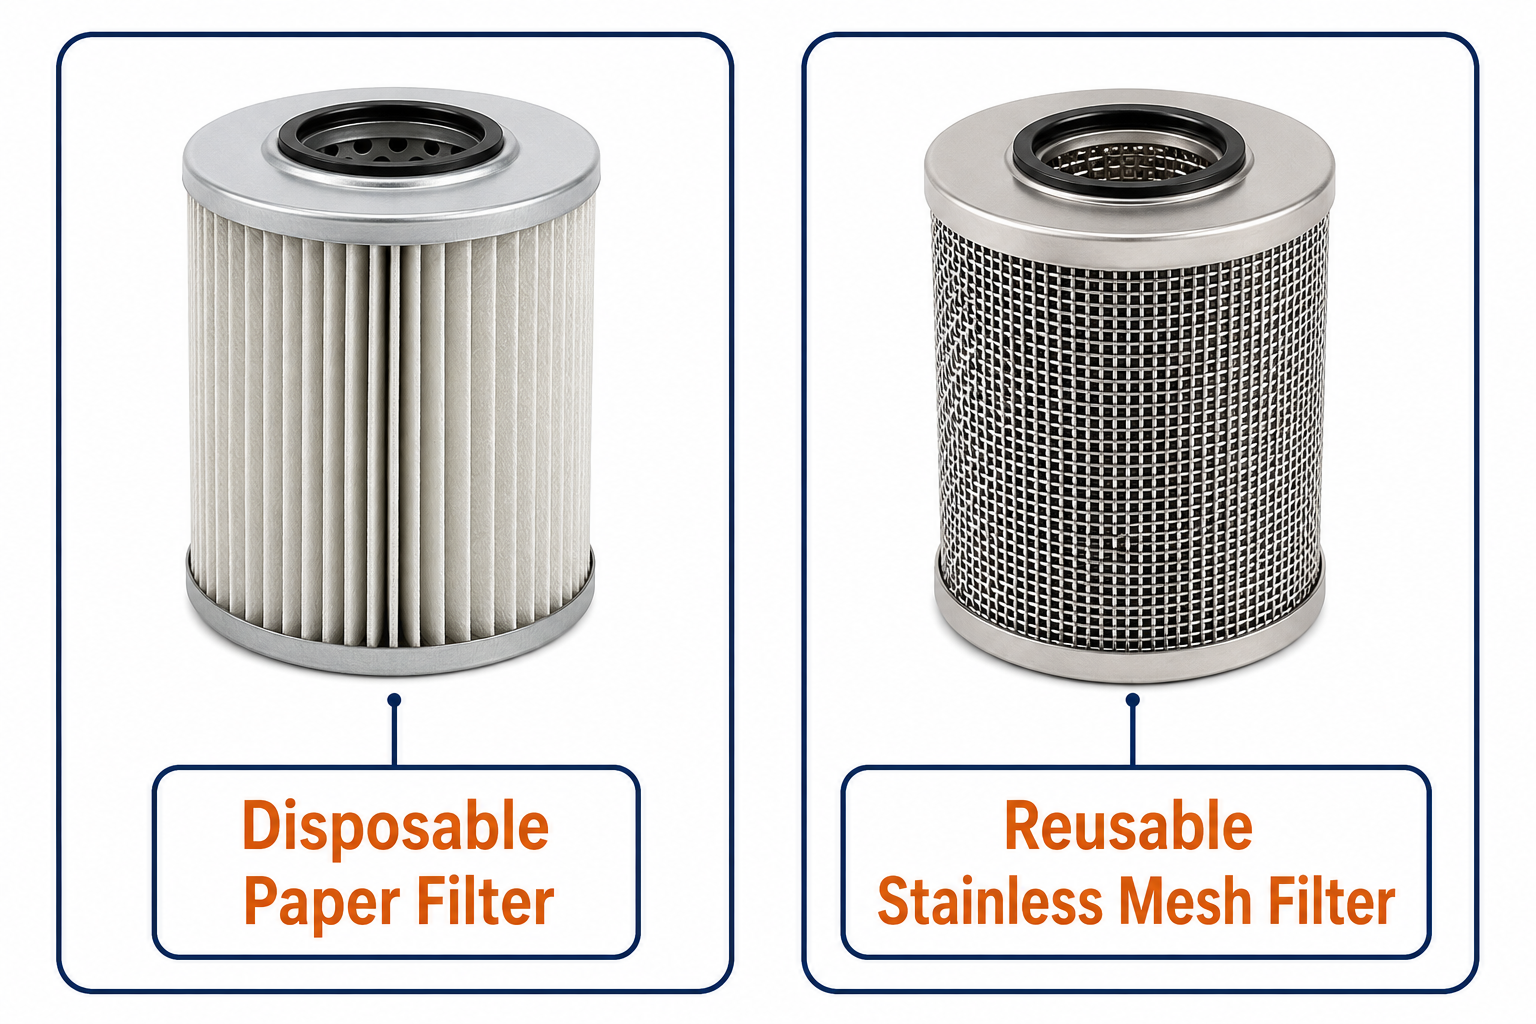
Most reusable oil filters come from performance brands like K&N, PC Racing FLO, and K&P Engineering. They are almost always spin-on designs that replace a standard disposable filter directly.
How It Differs from a Standard Filter
A standard spin-on or cartridge oil filter uses layered paper or synthetic fiber media. That media captures particles, but it loads up over time and cannot be cleaned. You remove it and throw it away.
A reusable filter uses a woven stainless mesh. The mesh captures larger metallic and debris particles, but it does not perform fine-particle filtration the way quality paper media does. The trade-off is longevity: the mesh can be washed hundreds of times without degrading.
What a Reusable Filter Does Not Do
This is worth stating clearly. A stainless mesh element does not replicate the filtration efficiency of a full-synthetic paper media filter. Most stainless mesh elements are rated in the 25 to 40 micron range for particle capture. A quality paper media filter can be rated to 20 to 25 microns absolute.
If fine-particle filtration matters to you, a premium disposable filter is still the better choice.
How Often Should You Clean a Reusable Oil Filter?
Clean the filter at every oil change. Even if the manufacturer says the element can go longer, matching the cleaning interval to the oil change interval keeps the process simple and ensures you are never running with a partially blocked element.
For most drivers on a conventional oil schedule, that means every 5,000 to 7,500 miles. For synthetic oil users, it means every 7,500 to 10,000 miles.
Signs the Filter Needs Cleaning Sooner
You do not need to wait for the oil change if you notice any of the following:
- Oil pressure drops at idle. A clogged mesh forces the bypass valve open, which bypasses filtration entirely.
- Visible sludge on the filter exterior. If the outside of the housing is caked in black residue, the element inside needs attention.
- Recent high-RPM or towing use. Hard driving generates more combustion byproducts and metallic debris.
What You Need to Clean a Reusable Oil Filter
- A shallow solvent-safe drain pan or plastic container
- Mineral spirits, kerosene, or a commercial parts cleaner
- A low-pressure garden hose (or a faucet with a spray nozzle)
- Lint-free shop rags or paper towels
- A fresh o-ring or filter gasket (check your filter's documentation)
- Nitrile gloves
Do not use:
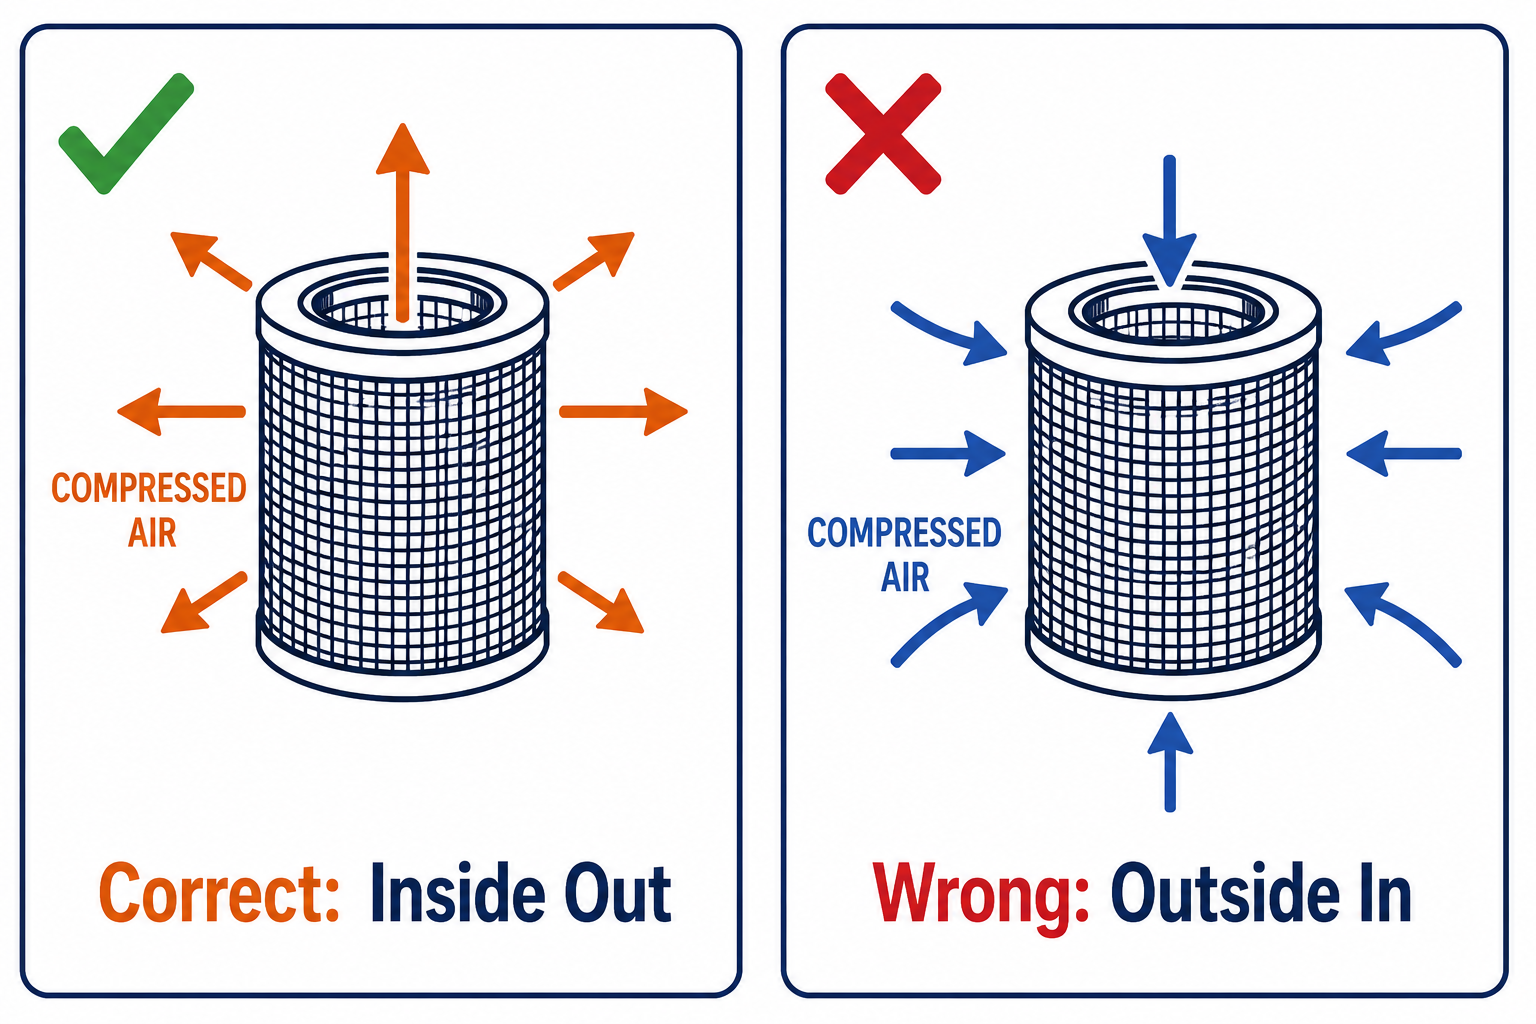
- Compressed air directed from outside in. This forces debris deeper into the mesh and can deform the wire screen on thinner elements. If you use compressed air, blow from the inside out only, at low-to-moderate pressure.
- Brake cleaner or carburetor cleaner. These solvents can strip protective coatings and may damage seals.
- A pressure washer. High-pressure water can deform mesh elements and force debris into areas you cannot see.
How to Clean a Reusable Oil Filter: Step-by-Step
K&P Engineering: Oil Filter Cleaning
Step 1: Remove the Filter from the Engine
Remove the reusable filter exactly as you would a standard spin-on filter. Place a drain pan under the filter before removing it, as residual oil will flow out. Let the filter drain for 30 seconds into the pan before carrying it to your cleaning area.
Step 2: Disassemble the Filter (If Your Model Allows It)
Some reusable oil filters are fully serviceable: you can unscrew the end cap and pull out the mesh element separately. Check your specific filter's documentation.
If your filter disassembles, separate the housing, mesh element, end cap, and any internal o-rings. Lay the parts out so you know where each piece goes back.
If your filter is a sealed assembly, proceed with the housing intact.
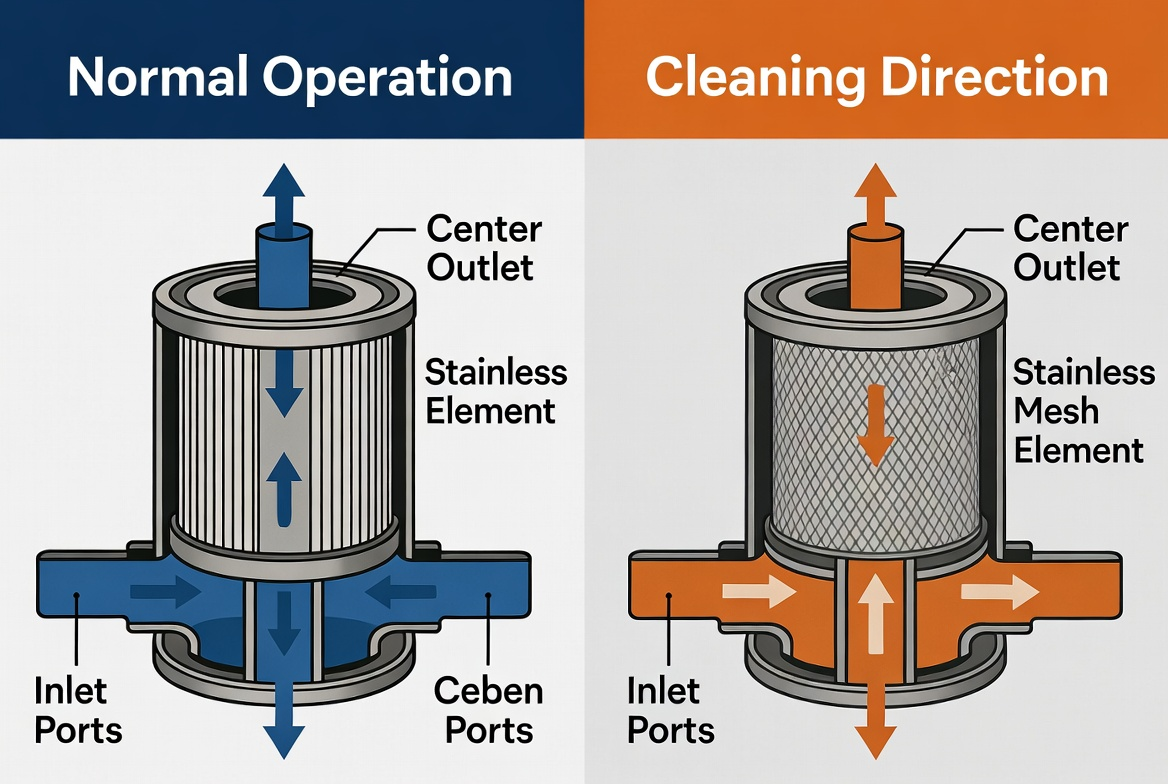
Step 3: Flush Out the Bulk Debris
Hold the filter over your drain pan with the inlet port facing up. Pour fresh mineral spirits or kerosene through the inlet. The solvent will push accumulated debris out through the outlet.
Repeat this two or three times until the solvent running out of the filter runs noticeably cleaner.
Direction matters. Always flush from the outlet side toward the inlet side for the initial cleaning pass. This pushes debris back out the way it came in, rather than forcing it deeper into the mesh.
Step 4: Rinse with Low-Pressure Water
After the solvent flush, rinse the element thoroughly with a garden hose at low pressure. Direct the water from the outlet side to the inlet side to continue pushing out any remaining loosened particles.
Step 5: Inspect the Mesh
Hold the clean, wet element up to a light source. You should be able to see light through the mesh evenly across the entire surface. If there are dark patches where light does not pass through, the element is still partially blocked. Repeat the solvent flush.
Look for physical damage at the same time:
- Dents or distortions in the mesh. A deformed mesh section does not filter correctly.
- Holes or tears. Any breach in the mesh allows unfiltered oil to pass through.
- Damaged end caps or seals. Cracks in end caps allow oil to bypass the element entirely.
If you find any of these issues, the element needs to be replaced, not reinstalled.
Step 6: Dry the Filter Completely
This step takes longer than most people expect. Set the filter upright or at an angle in a clean area and let it air dry for a minimum of 2 hours. In humid conditions, allow longer.
You can use a lint-free rag to wipe external surfaces. If you choose to use compressed air to speed up drying, blow from the inside out only. Never direct compressed air at the outer surface of the mesh.
The element must be completely dry before reinstallation. Water trapped inside the housing dilutes the oil charge on startup and promotes rust.
Step 7: Install a Fresh O-Ring or Gasket
Replace the o-ring or gasket before reinstalling. Even if the old one looks fine, reusing a compressed gasket is the primary cause of oil leaks after reinstalling a reusable filter.
Apply a thin film of clean engine oil to the new o-ring to help it seat evenly. Do not use gasket sealer or RTV.
Step 8: Reinstall the Filter
Thread the filter on by hand until the gasket contacts the mounting surface. Then tighten by hand an additional half to three-quarters of a turn. Do not use a filter wrench to tighten.
After starting the engine, let it idle for 30 seconds, then shut it off and inspect the filter for leaks before driving.
Can You Damage a Reusable Oil Filter by Cleaning It Wrong?
Yes. The most common cleaning mistakes and their consequences:
When Should You Replace Instead of Clean?
Reusable filters are built to last, but they are not invincible. Replace the element or the entire filter assembly when you observe:
- Visible mesh damage: tears, holes, deep dents, or areas where the mesh has separated from the end cap
- A cracked housing: aluminum housings can crack from overtightening or impact
- An o-ring groove that no longer seats properly: if the groove is deformed or the housing threads are compromised, no o-ring will create a reliable seal
- Persistent oil pressure drops that continue after cleaning: this suggests the mesh is too clogged to restore, or the bypass valve is stuck open
Most quality reusable filter manufacturers provide replacement mesh inserts separately, so you do not need to replace the entire housing assembly.
Is a Reusable Oil Filter Worth It?
The math favors reusable filters over a long ownership period. A quality disposable oil filter costs $8 to $20 per oil change. Entry-level reusable stainless mesh filters from brands like PC Racing FLO start around $40 to $80. Premium billet-housing filters from K&P Engineering run $100 or more.

The Best Oil Filter - Testing Paper vs Fibreglass vs Steel
At the lower end, you break even after five to eight oil changes. Premium units take longer to recover the cost, but they are built to last the life of the vehicle.
The maintenance requirement is the honest trade-off. Cleaning a reusable filter takes 15 to 20 minutes that a disposable filter change does not. If you skip the cleaning or do it carelessly, you are running with compromised filtration.
Who Benefits Most from a Reusable Filter
- Enthusiasts who do frequent oil changes and enjoy the extra maintenance step
- Vehicles with hard-to-source disposable filter sizes
- Fleet operators who want to reduce parts cost over high mileage
Who Should Stick with Disposables
- Drivers who want the highest possible filtration efficiency at fine micron sizes
- Anyone who finds the cleaning process an inconvenient burden
- Vehicles where the manufacturer specifies a rated-efficiency disposable filter for warranty compliance
What Happens If You Reinstall Without Cleaning?
Running a clogged reusable filter is more consequential than running a clogged disposable. A disposable filter has a bypass valve that opens under pressure, allowing unfiltered oil to flow through rather than starving the engine. Most reusable filters also have bypass valves.
But relying on the bypass valve is not a strategy. Bypass oil is completely unfiltered. Metal particles, combustion byproducts, and soot pass straight through to your bearings when the bypass valve is open.
A dirty stainless mesh also builds up a biofilm of oxidized oil over time. This residue does not wash off easily and progressively restricts flow even after the loose debris is flushed out.
Clean it at every oil change. The filter is only doing its job if the mesh is clear.
FAQ
Can I use dish soap to clean a reusable oil filter?
Some manufacturers, including PC Racing FLO, list dish soap as an acceptable cleaning agent. It is better than nothing, but it is less effective at dissolving heavy oil deposits than mineral spirits or kerosene. For a lightly soiled filter, dish soap with a water rinse is fine. For a filter with significant buildup, use a solvent first, then finish with a water rinse.
Do I need to re-oil a reusable oil filter after cleaning?
No. Reusable oil filters are dry-mesh filters, not oiled cotton gauze designs. No re-oiling step is required. The mesh works by mechanical interception, not adhesion. Applying oil to the mesh would restrict flow and potentially introduce contaminants.
How many times can you clean and reuse a stainless mesh oil filter?
A quality stainless mesh element can be cleaned hundreds of times without degrading, provided it has not been physically damaged. Inspect the mesh visually at every cleaning. Replace on any sign of physical damage, not on a fixed cleaning count.
Can I run a reusable oil filter on a new or recently rebuilt engine?
Not for the break-in period. New and recently rebuilt engines shed metallic particles as surfaces wear in. A fine-particle disposable filter captures this break-in debris more effectively than a stainless mesh filter. Use a quality disposable filter for the first 500 to 1,000 miles, then switch to your reusable filter if desired.
What is the best solvent for cleaning a reusable oil filter?
Mineral spirits and kerosene are the most widely recommended options. They dissolve oil deposits effectively, are relatively safe to work with in a well-ventilated area, and do not damage metal or rubber components. Commercial parts washer fluid works equally well.