How to Cut Open an Oil Filter to Check for Engine Wear


Cutting open a used oil filter is one of the most direct ways to see what your engine is shedding. The filter media traps metal particles, sludge, and debris that never make it back into the engine. By inspecting those particles, you can catch bearing wear, piston ring problems, and early stage engine damage before they escalate into a catastrophic failure.
Why Cut Open a Used Oil Filter?
Your oil filter is a passive recorder of everything that happened inside your engine during the last oil change interval. Every metal particle that broke free from a bearing surface, every chunk of gasket material that passed through,every crystallized sludge fragment: the filter caught it.
A visual inspection of the drained oil tells you almost nothing. The particles that matter most are microscopic or near-microscopic. They settle in the filter media, not floating visibly in the pan.
Cutting open the filter gives you direct physical access to that debris. Combined with a magnet and a flashlight, you can identify what type of material is present and make an informed judgment about what is happening inside the engine.
This technique has been used for decades by serious engine builders, fleet maintenance operations, and high-mileage enthusiasts. It is not exotic. The only tool requirement is a filter cutting tool or a sharp hacksaw.
What Tools Do You Need to Cut Open an Oil Filter?
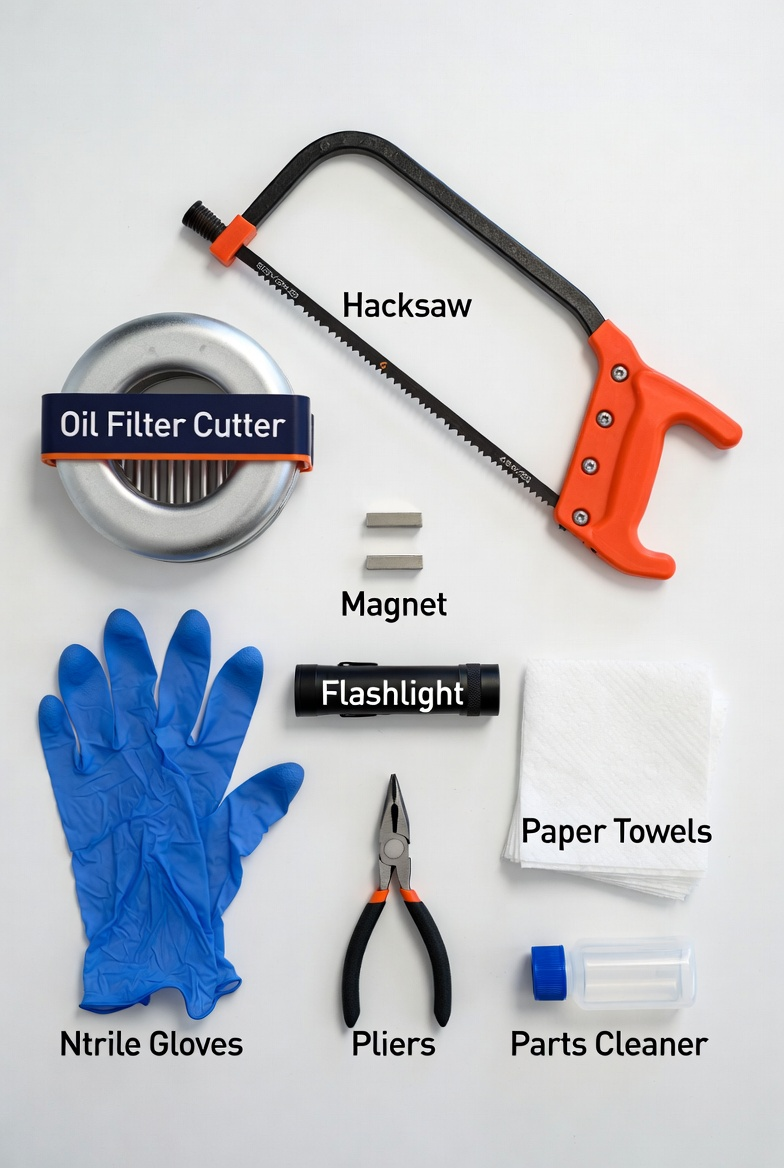
You need very few things:
- An oil filter cutter tool (the cleanest and safest method) or a hacksaw with a fine-tooth metal blade
- A drain pan or plastic bag (to contain residual oil)
- Latex or nitrile gloves
- A strong rare-earth or neodymium magnet
- A flashlight or bright work light
- A pair of needle-nose pliers or long tweezers
- A white paper towel or clean white rag
- A small container of parts cleaner or mineral spirits (optional, for rinsing the media)
The dedicated filter cutter is worth owning if you plan to do this regularly. It scores and rolls around the filter's seam without crushing the housing, which keeps the internal components intact and makes debris analysis easier. Hacksaw cuts work but can scatter metal shavings from the saw blade itself into the debris sample, which requires you to be more careful about distinguishing filter debris from saw debris.
How to Cut Open an Oil Filter: Step-by-Step
http://www.youtube.com/watch?v=zrH92W6ODy4&start=0
Step 1: Let the Filter Drain and Cool
After removing the filter, place it upright in a drain pan for at least 30 minutes. Most of the residual oil will drain out through the center tube. This makes the cutting process cleaner and reduces the mess when you open it.
Do not skip cooling time if the filter came off a hot engine. The oil inside can be above 200°F.
Step 2: Position the Filter Cutter
If using a dedicated filter cutter, clamp it around the outer canister just below the base plate (the flat end with the threads). Most filters have a clearly visible seam or a slightly raised ring at this point.
If using a hacksaw, make your cut at the same location. Keep the blade square to the filter axis and use slow, controlled strokes to avoid distorting the housing.
Step 3: Cut Around the Canister
Rotate the filter cutter tool around the canister with steady, even pressure. Most quality cutters complete the cut in 3 to 5 full rotations. You will feel the resistance drop as you breach the metal wall.
With a hacksaw, work around the circumference in sections rather than trying to cut straight through in one pass.
Step 4: Open the Filter Over a Pan
Once the cut is complete, hold the filter upside down over your drain pan and pull the two sections apart. The internal assembly (the filter element, the center tube, the anti-drainback valve, and the bypass valve spring) will slide out as a unit or in pieces depending on the design.
Set all components on a white paper towel.
Step 5: Peel Open the Filter Element
The filter element is a cylinder of pleated media wrapped around a perforated center tube. Grip the outer edge and unroll or separate the pleats so the full media surface is exposed.
If the media tears apart easily, that is normal. Cellulose-based media softens after extended oil contact. Synthetic media tends to hold its shape better.
Step 6: Inspect With Magnet, Light, and Eyes
Run the magnet slowly across the inside surface of the canister bottom first. Any ferrous metal particles will leap to the magnet face. Set those aside on white paper.
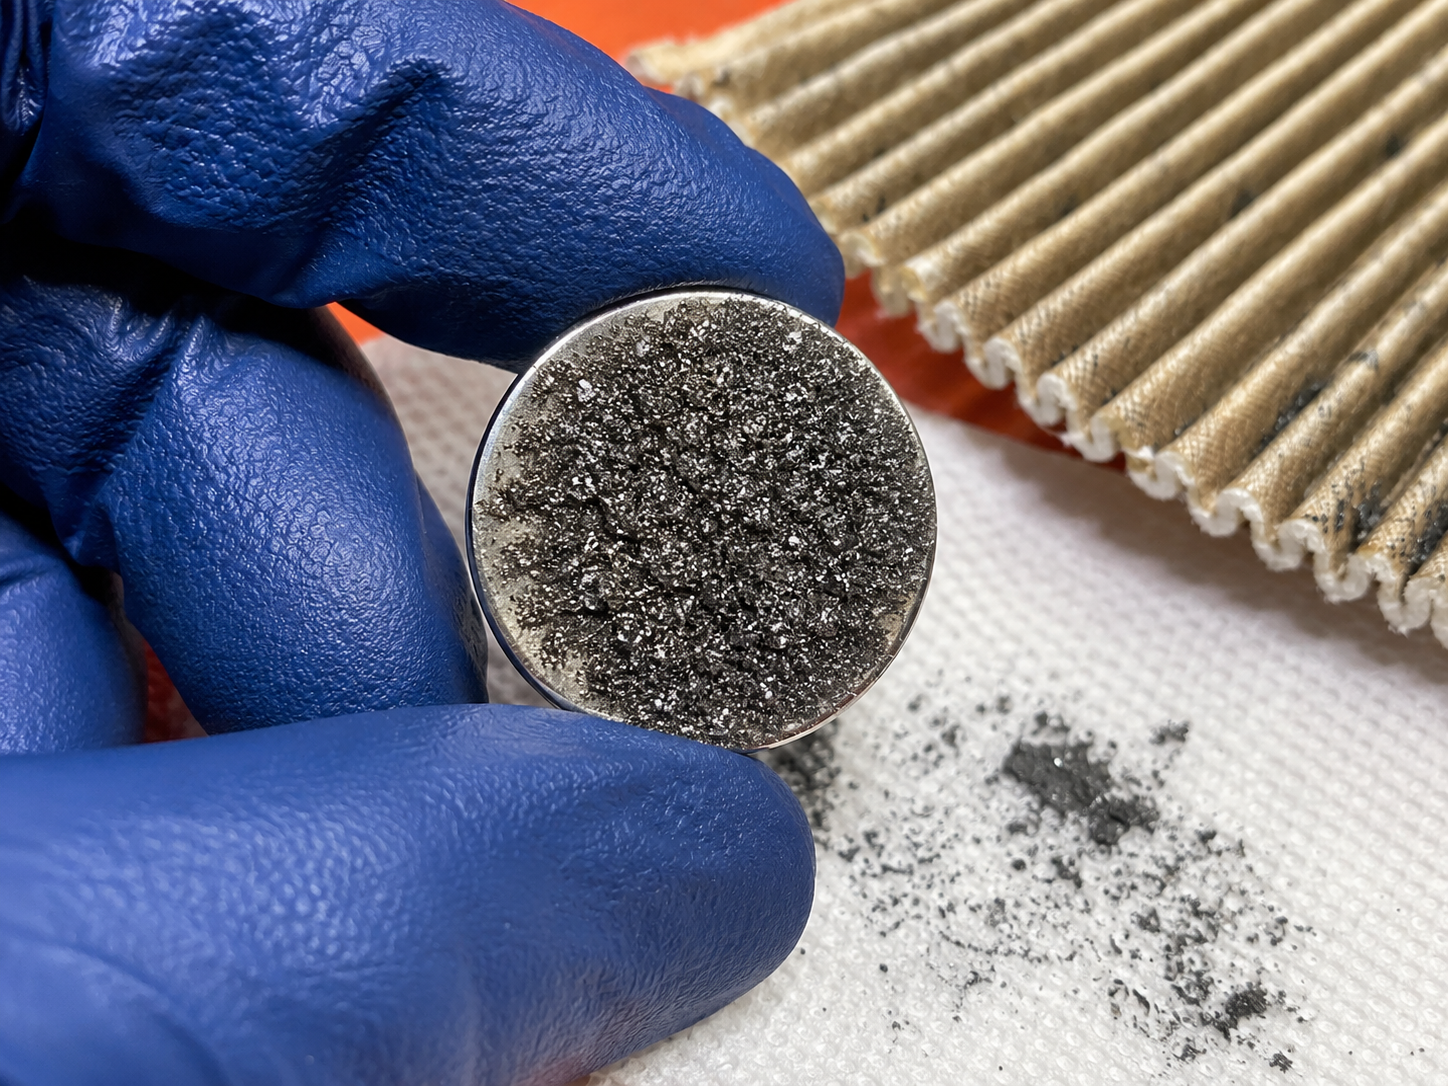
Then run the magnet across the unrolled filter media. Ferrous particles will cluster on the magnet.
Examine remaining particles under bright light. Use needle-nose pliers to move them around.
What to Look For Inside a Cut-Open Oil Filter
Normal Findings
Some debris is expected and does not indicate a problem:
- Fine gray metalite (powder-like): Normal friction film from bearing and cylinder wall surfaces during break-in or regular operation. When wiped on white paper, it leaves a gray smear with no distinct particles visible.
- Small black particles: Combustion soot that bypassed the rings. Common in diesel engines and in gasoline engines approaching the end of an extended drain interval.
- Tiny non-metallic specks: Gasket or seal material. Most appear brown, tan, or orange and do not attract to the magnet.
- A small amount of sludge or dark gel: Normal in conventional oil at the end of a long interval, especially in engines with short-trip driving patterns.
The key benchmark for normal ferrous debris is quantity and size. Very fine powder that barely registers on the magnet face, present in small amounts, is expected.
Concerning Findings
The following require investigation:
Bright silver or aluminum flakes: Aluminum is non-ferrous and will not attract to the magnet. Bright, flat, shiny flakes or foil-like pieces indicate aluminum component wear. Common sources are piston skirts, rod bearings in some engines (aluminum-backed bearings), timing chain guides, and oil pump gears.
Copper-colored particles: Copper or brass material. Primary sources are rod bearing overlays and thrust washers. Copper debris in significant quantity is a serious bearing wear indicator.
Ferrous chunks or flakes visible to the naked eye: Particles large enough to be seen individually rather than as a smear are concerning. Normal wear does not produce particles this large. Sources include spalling bearing surfaces, camshaft lobe wear, lifter faces, and gear teeth.
Bearing material clusters: A mix of aluminum, copper, and ferrous particles together indicates a bearing is failing. Rod bearings and main bearings are layered structures. Shedding all three materials at once means the layering is breaking down.
Rubber fragments: Black, pliable pieces indicate seal degradation. An isolated small piece is not alarming. Multiple pieces suggest an internal seal is deteriorating.
Shiny metallic flakes in large quantity: Any bright, reflective flake population that covers more than a small patch of the filter media surface is a red flag regardless of material type.
What Does Metal in an Oil Filter Mean?
Understanding Wear Particle Size
The relationship between particle size and damage severity is counterintuitive to most people. Larger particles are actually easier to detect and in some ways less immediately dangerous than smaller ones.
http://www.youtube.com/watch?v=pPUyIlNfqkc&start=0
Most spin-on oil filters are rated to capture particles at their absolute threshold somewhere in the 20 to 40 micron range, depending on media quality. Particles larger than the filter's absolute cutoff are caught and stay in the filter. They do not return to the engine.
The most damaging particles are the ones small enough to pass through the filter media and small enough to enter bearing oil film clearances. Engine bearing clearances typically run in the 10 to 25 micron range, and particles in that same size window are hard enough to score bearing surfaces with every revolution. These particles circulate continuously. The filter catches a fraction of them on each pass, but the damage accumulates between passes.
What you find in the cut-open filter represents the larger-particle population. It is a visible proxy for what is happening. But the particles doing the most damage may be smaller than what you can see.
Calibrating What You're Looking At
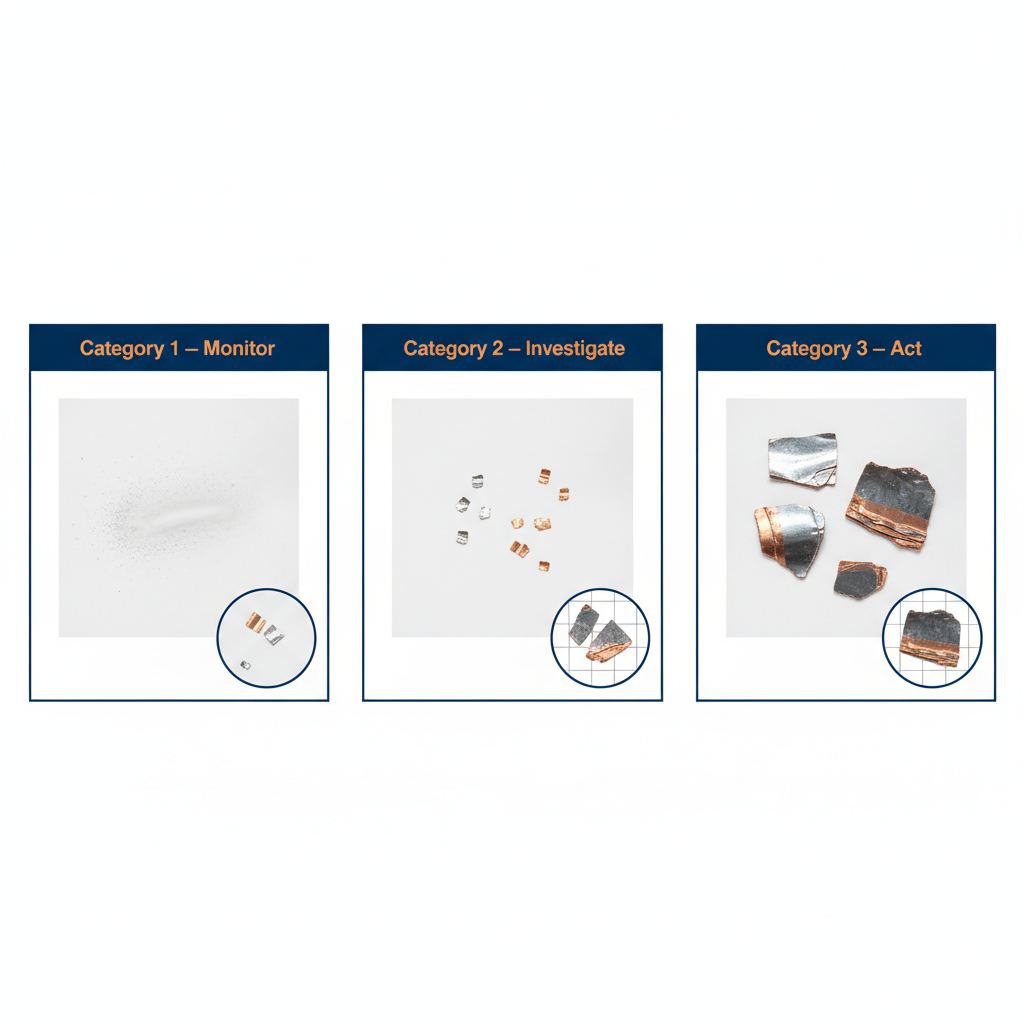
Severity scales from the engine maintenance community typically sort cut-open filter findings into three categories:
Category 1: Monitor. Fine gray metalite smear, small soot specks, a trace of non-metallic fragments. Consistent with normal engine operation. Change the oil, check again at the next interval.
Category 2: Investigate. Individual bright flakes visible to the naked eye, a visible copper smear, ferrous particles that cluster more than expected on the magnet. Investigate potential sources. Consider a used oil analysis (UOA) to quantify wear element concentrations. Shorten the next drain interval.
Category 3: Act. Chunks of metal, layered bearing material (silver + copper together), large ferrous flakes, rubber fragments combined with metal. Do not continue driving until the source of the debris is identified. An oil analysis at this point will confirm severity.
to Read the Filter Media After Cutting — Checking Media Flow Distribution
How to Read the Filter Media After Cutting
The filter media tells a different story from the loose debris in the canister bottom.
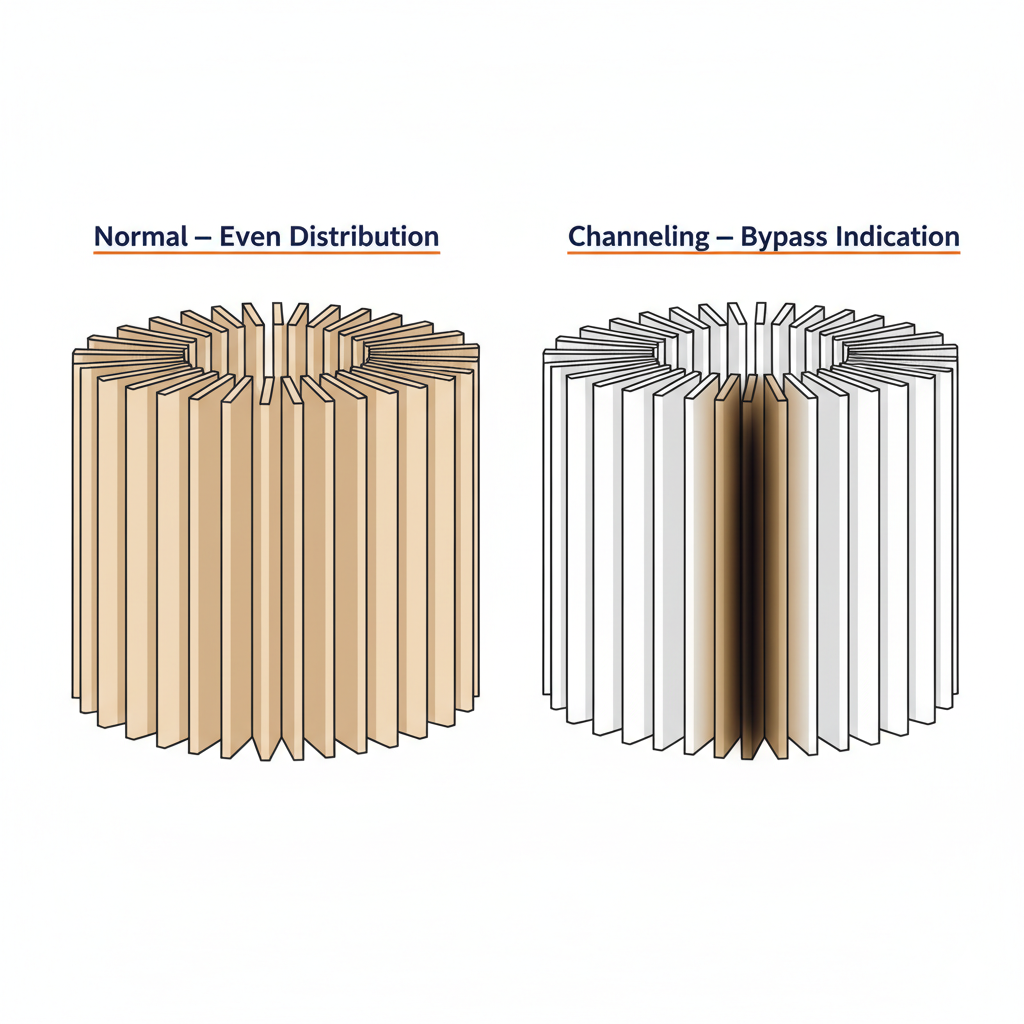
Checking Media Flow Distribution
When you unroll the filter media, look at the distribution of contamination across the pleats. In a healthy filter, contamination tends to be light and fairly even across all pleats.
Channeling: If only a few pleats are darkly stained and the rest are nearly clean, the oil flow is bypassing most of the filter. This often indicates the bypass valve opened frequently during the drain interval, which happens when the filter is overloaded, the oil was highly contaminated, or the filter was left in service too long.
Heavy saturation on inlet side only: The outer surface of the pleats is the inlet side. If the outer surface is nearly black with soot while the inner surface is light, the filter was doing its job aggressively. Normal for a long interval or a dirty engine.
Uniform saturation through the full pleat depth: The filter was working hard throughout the interval. Can indicate high combustion byproduct intrusion.
What the Media Color Tells You
- Light tan to light brown: Normal for conventional oil at a standard interval.
- Dark brown to black throughout: Heavily loaded with combustion products. Normal for diesels and extended drain intervals.
- Gray metallic sheen across the media: Elevated metallic wear content throughout the interval.
- Orange or reddish staining: Can indicate coolant contamination. Coolant and oil form an orange-brown emulsion.
If you see orange staining combined with a slightly sweet smell from the residual oil, suspect a head gasket leak or a cracked block. This is a high-priority finding.
How Often Should You Cut Open Filters for Inspection?
You do not need to cut open every filter. The technique is most valuable in specific situations:
- New engine break-in: Cut open the filter at the first oil change (typically 500 to 1,000 miles). Break-in debris should be present but should be predominantly fine gray powder, not flakes or chunks.
- High-mileage engines: Once an engine passes 150,000 miles, doing an annual cut-open inspection gives you early warning of any wear acceleration.
- After a known hard event: Track day, overheating incident, extended oil pressure drop, or any situation where the engine was stressed beyond normal parameters.
- When establishing a baseline: If you just bought a used vehicle and don't know its full history, cut open the first filter you pull to see what the previous owner's engine left behind.
- When an oil analysis flags elevated wear metals: A used oil analysis can tell you the elements present (iron, copper, aluminum). Cutting the filter open gives you the visual complement to those numbers.
For most daily drivers in good health, cutting open every 2nd or 3rd filter is more than sufficient.
FAQ
Is cutting open an oil filter dangerous?
The main risks are residual hot oil and sharp metal edges. Always let the filter drain and cool completely before cutting. Wear gloves. The cut edge of the canister is sharp. Handle it carefully and use pliers when separating sections rather than gripping the cut edge barehanded.
Can I use any hacksaw to cut open a filter?
Yes. A standard hacksaw with a fine-tooth blade (24 or 32 TPI) works on any spin-on filter canister. The dedicated filter cutter is cleaner and faster, but the hacksaw is a viable option for occasional use. The main downside is that fine saw shavings can mix with your debris sample, so keep that in mind when interpreting what you find.
What is a used oil analysis and should I do it alongside filter inspection?
A used oil analysis (UOA) is a lab test that measures wear metal concentrations (iron, copper, aluminum, lead, chromium), fluid contamination (coolant, fuel), and oil condition (viscosity, TBN, oxidation). It costs roughly $25 to $35 per sample. Cutting open the filter gives you a visual; the UOA gives you quantified numbers. Together they give you the most complete picture of what is happening inside the engine. For high-mileage vehicles or performance builds, running both makes sense.
What does a small amount of copper in the filter mean?
A trace of copper is normal. Rod and main bearings in most engines use a copper-lead overlay on top of a steel back. Small amounts of copper show up in oil analysis on almost any engine. The concern begins when you see visible copper flakes in the cut-open filter or when a UOA shows a sharp increase in copper concentration between samples. Increasing copper trending upward is more significant than a single absolute number.
Can cutting open oil filters replace regular oil analysis?
No. Cut-open filter inspection catches larger particles and gives you a visual. Oil analysis catches dissolved metals, coolant contamination, fuel dilution, and sub-micron wear products that are invisible to the naked eye. They complement each other. Filter inspection is free and immediate. Oil analysis gives you quantified, trended data. Neither one alone tells the complete story.
Getting Started
Pull a filter from your last oil change if you have one sitting around. Drain it, cut it open, and run a magnet across the media. You will immediately get a feel for what normal looks like. That baseline is what makes a future abnormal finding recognizable.
The investment is low. An oil filter cutter runs under $25. The information it can surface: early bearing wear, seal degradation, coolant contamination. That is worth far more than the cost of the tool.